Quantcast
Channel: UnixArena
Viewing all 429 articles
Browse latest View live

Ansible Engine – Run Playbook using Jenkins – GUI

$
0
0

Can’t afford Ansible Tower? Worried about  AWX stability  (Open Source Ansible Tower’s upstream Project )? Jenkins is more than enough to run the Ansible playbook from GUI. Ansible Tower’s main selling point is RBAC (Role based access control), credentials encryption and REST API. When you use Jenkins, it has plenty of plugins to offer role-based access control, in-built credentials encryption, and API support. In this article, we will walk through how to integrate ansible playbook in Jenkins and test it. At some point, I felt Jenkins is powerful enough on enterprise infrastructure automation.

Required Components on RHEL 7/Cent OS :

  • Jenkins
  • Ansible Engine
  • Internet Connectivity


1. Download and install Jenkins on RHEL 7 /CentOS 7.


2. Download and install Ansible Engine on RHEL 7 / CentOS 7.


Installing and Configuring Ansible plugin for Jenkins:

3. Login to Jenkins portal as an administrator.


4. Search for Ansible plugin and install it.

Install Ansible Plugin - Jenkins
Install Ansible Plugin – Jenkins


Navigate to the global tool configuration.

Jenkins - Global Tool configuration - Ansible
Jenkins – Global Tool configuration – Ansible


You must update the ansible executable paths in Ansible plugin configuration like below.

Configure Ansible Engine path - Jenkins
Configure Ansible Engine path – Jenkins


Integrating Ansible Playbook in Jenkins Job: 

5. Once the ansible plugin is installed, we are good to start creating the freeform style template to invoke ansible playbook.

Jenkins - Freestyle project for Ansible integration
Jenkins – Freestyle project for Ansible integration


6. Enter the job name. Here, my playbook will simply check the root filesystem usage on Linux hosts.

Freestyle Jenkins Job Name - Ansible
Freestyle Jenkins Job Name – Ansible


7. Update the valid description of the job and click on “Build”.

Description of the Jenkins Job


8. Select “Invoke Ansible Playbook” from “Add build step”.

Jenkins Invoke Ansible Playbook


9. Enter the playbook path and host inventory path. Add credentials if the playbook requires authentication via password.

Ansible Playbook and Host Path - Jenkins
Ansible Playbook and Host Path – Jenkins


10. Enter the credentials for ansible client nodes.  (remote user)

Credentials - Jenkins
Credentials – Jenkins


11. Select the credentials which you have just added on the job and Save the job.

Select the credentials for Ansible Play


Testing the Jenkins Job:

12. From the job, click on Build to trigger the playbook.

Build Jenkins Job - invoke Ansible playbook
Build Jenkins Job – invoke Ansible playbook


13. When you click the job ID, you will be navigated to the following page.

Click on Build Job Number - Jenkins
Click on Build Job Number – Jenkins


14. Click on console output to see the Ansible playbook output.

Jenkins Build Job - Ansible console output
Jenkins Build Job – Ansible console output


We have successfully integrated ansible playbook in Jenkins. Hope this article is informative to you.

Share it! Comment it!! Be Sociable!!!

The post Ansible Engine – Run Playbook using Jenkins – GUI appeared first on UnixArena.


Jenkins – Passing Extra variables for Ansible Playbook

$
0
0

Ansible Playbooks are often written with many extra variables to pass the human inputs. In Ansible Tower /AWX,  “SURVEY” feature is used to pass the extra variable to the playbook. If you are using Jenkins as your front-end graphical interface, you might be wondering how to pass the ansible extra variable. This article will walk through how to get the variable input in Jenkins to build and passing to Ansible playbook.

Let’s see the demonstration.

Capturing Variable input in Jenkins:

1. Login to Jenkins web page.


2. Edit the Jenkins job to enable the parameterized build option. If you do not have an Ansible playbook – Jenkins job create a one as described here.


3.  Click on the configure job and select “This project is parameterized”  option. Click on “Add Parameter”

Check Project - Parameterized
Check Project – Parameterized


4. Select the parameter type according to your playbook variable.

Jenkins - String Parameter - Ansible extra-vars
Jenkins – String Parameter – Ansible extra-vars


5. Enter the Meaningful parameter name which will be prompted during the execution. Note that this variable is just within Jenkins level.

Parameter - Jenkins - String - Extra- vars - Ansible
Parameter – Jenkins – String – Extra- vars – AnsibleNo


Ansible sample Playbook with an extra variable:

6. Here is my sample playbook with an extra variable. Here FS_NAME is an extra variable which needs to be passed during the playbook execution.

---
- hosts: all
  gather_facts: no

  tasks:
  -  name: Root FS usage
     shell: df -h {{ FS_NAME }} |awk ' { print $5 } ' |grep -v Use
     register: dfroot

  -  debug:
       msg: "System {{ inventory_hostname }}'s {{ FS_NAME }} FS utiliation is {{ dfroot.stdout }}"


Mapping Jenkins variable with Ansible Extra variable: 

7.  Click on Jenkins job build tab and navigate to “Invoke Ansible Playbook”. Click on “Advanced” tab.

Invoke Ansible Playbook - Advanced -Jenkins
Invoke Ansible Playbook – Advanced -Jenkins


8. Click on “Add Extra variable”.

Add Extra Variable - Invoke Ansible Playbook Plugin
Add Extra Variable – Invoke Ansible Playbook Plugin


9. Update the ansible playbook extra variable in key field (which is FS_NAME – Refer step 6).  In the value field, update the Jenkins variable which we have created in step 5.  Save the job.

Enter Ansible playbook - extra variable
Enter Ansible playbook – extra variable


We have successfully mapped the Jenkins parameter to Ansible extra variable.


Test our work :

10. Click on “Build with Parameter”.

Build with Parameters - Jenkins - Ansible
Build with Parameters – Jenkins – Ansible


11. The job will be prompted to enter the value for FS_NAME.  Here, I have passed “/var” as input.

Jenkins Build job with Parameter - Ansible
Jenkins Build job with Parameter – Ansible


12. Here are the job results.  In this screenshot, you could see that FS_NAME variable got the value which I have passed in the above step.

Console output - Ansible Playbook
Console output – Ansible Playbook

Similar to this, you could add as many as variable and map to ansible playbook’s extra variables.

Hope this article is informative to you. Share it! Comment it!! Be Sociable!!!

The post Jenkins – Passing Extra variables for Ansible Playbook appeared first on UnixArena.

Ansible – Configure Windows servers as Ansible Client – winrm

$
0
0

Ansible is not just for Linux. It can also be used for Windows servers automation. This article will explain how to prepare windows servers for Ansible automation. Ansible uses WinRM protocol to establish a connection with Windows hosts. (i.e Linux/Unix like hosts uses SSH protocol). Ansible requires PowerShell 3.0 or newer and at least .NET 4.0 to be installed on the Windows host. Windows Server 2008 R1 will not meet the ansible requirement and mandatory components need to be upgraded. Windows Server 2008 R2 and later releases are shipping with all the required components to support ansible.

WinRM Port Details: 

  • WinRM http Port – 5985
  • WinRM https Port – 5986 (HTTPS)


It’s always recommended to use a secure port (https) for Ansible automation. Passing plain text password via the insecure port is not supported.  Please go through this article to learn more about the various WinRM setup.

Option Local Accounts Active Directory Accounts Credential Delegation HTTP Encryption
Basic Yes No No No
Certificate Yes No No No
Kerberos No Yes Yes Yes
NTLM Yes Yes No Yes
CredSSP Yes Yes Yes Yes


Here, we will be talking about the basic authentication method over https.

1.  Login to windows server as an administrator and execute the sequence of commands to setup WinRM for Ansible in Powershell.

Ansible - Enable WinRM for windows server

Here are the commands to copy & paste to PowerShell terminal.

PS C:\Users\Administrator> $url = "https://raw.githubusercontent.com/ansible/ansible/devel/examples/scripts/ConfigureRemotingForAnsible.ps1"
PS C:\Users\Administrator> $file = "$env:temp\ConfigureRemotingForAnsible.ps1"
PS C:\Users\Administrator> (New-Object -TypeName System.Net.WebClient).DownloadFile($url, $file)
PS C:\Users\Administrator> powershell.exe -ExecutionPolicy ByPass -File $file
Self-signed SSL certificate generated; thumbprint: 5FAF0EAEF69EBB15A6B7CB9C80C29884D2F381C1


wxf                 : http://schemas.xmlsoap.org/ws/2004/09/transfer
a                   : http://schemas.xmlsoap.org/ws/2004/08/addressing
w                   : http://schemas.dmtf.org/wbem/wsman/1/wsman.xsd
lang                : en-US
Address             : http://schemas.xmlsoap.org/ws/2004/08/addressing/role/anonymous
ReferenceParameters : ReferenceParameters

Ok.
PS C:\Users\Administrator>


2. If you do not have internet connection on the windows host, you can download this PowerShell script and execute it locally. Rename the file extenstion after downloading it. Execute the script in powershell terminal to setup WinRM for Ansible.

PS C:\Users\Administrator\Desktop> .\Setup-winrm-For-Ansible.ps1
Self-signed SSL certificate generated; thumbprint: 79FBCADD70DFDS778D5A4E220FA0911A72C21963E4B

wxf                 : http://schemas.xmlsoap.org/ws/2004/09/transfer
a                   : http://schemas.xmlsoap.org/ws/2004/08/addressing
w                   : http://schemas.dmtf.org/wbem/wsman/1/wsman.xsd
lang                : en-US
Address             : http://schemas.xmlsoap.org/ws/2004/08/addressing/role/anonymous
ReferenceParameters : ReferenceParameters

Ok.
PS C:\Users\Administrator\Desktop>


3. Check for the window authentication method status.

PS C:\Users\Administrator\Desktop> Get-ChildItem WSMan:\localhost\Service\Auth
   WSManConfig: Microsoft.WSMan.Management\WSMan::localhost\Service\Auth
Type            Name                           SourceOfValue   Value
----            ----                           -------------   -----
System.String   Basic                                          true
System.String   Kerberos                                       true
System.String   Negotiate                                      true
System.String   Certificate                                    false
System.String   CredSSP                                        false
System.String   CbtHardeningLevel                              Relaxed


4. Run the following command to get the WinRM configuration.

PS C:\Users\Administrator\Desktop> winrm get winrm/config
Config
    MaxEnvelopeSizekb = 500
    MaxTimeoutms = 60000
    MaxBatchItems = 32000
    MaxProviderRequests = 4294967295
    Client
        NetworkDelayms = 5000
        URLPrefix = wsman
        AllowUnencrypted = false
        Auth
            Basic = true
            Digest = true
            Kerberos = true
            Negotiate = true
            Certificate = true
            CredSSP = false
        DefaultPorts
            HTTP = 5985
            HTTPS = 5986
        TrustedHosts
    Service
        RootSDDL = O:NSG:BAD:P(A;;GA;;;BA)(A;;GR;;;IU)S:P(AU;FA;GA;;;WD)(AU;SA;GXGW;;;WD)
        MaxConcurrentOperations = 4294967295
        MaxConcurrentOperationsPerUser = 1500
        EnumerationTimeoutms = 240000
        MaxConnections = 300
        MaxPacketRetrievalTimeSeconds = 120
        AllowUnencrypted = true
        Auth
            Basic = true
            Kerberos = true
            Negotiate = true
            Certificate = false
            CredSSP = false
            CbtHardeningLevel = Relaxed
        DefaultPorts
            HTTP = 5985
            HTTPS = 5986
        IPv4Filter = *
        IPv6Filter = *
        EnableCompatibilityHttpListener = false
        EnableCompatibilityHttpsListener = false
        CertificateThumbprint
        AllowRemoteAccess = true
    Winrs
        AllowRemoteShellAccess = true
        IdleTimeout = 7200000
        MaxConcurrentUsers = 10
        MaxShellRunTime = 2147483647
        MaxProcessesPerShell = 25
        MaxMemoryPerShellMB = 1024
        MaxShellsPerUser = 30

PS C:\Users\Administrator\Desktop> 


5. Login to Ansible server and install “pywinrm” pythonn module to support WinRM protocal.

[root@ansible-server ~]# pip install pywinrm
Collecting pywinrm
  Using cached https://files.pythonhosted.org/packages/0d/12/13a3117bbd2230043aa32dcfa2198c33269665eaa1a8fa26174ce49b338f/pywinrm-0.3.0-py2.py3-none-any.whl
Requirement already satisfied: xmltodict in /usr/lib/python2.7/site-packages (from pywinrm) (0.11.0)
Collecting requests>=2.9.1 (from pywinrm)
  Using cached https://files.pythonhosted.org/packages/ff/17/5cbb026005115301a8fb2f9b0e3e8d32313142fe8b617070e7baad20554f/requests-2.20.1-py2.py3-none-any.whl
Collecting requests-ntlm>=0.3.0 (from pywinrm)
  Using cached https://files.pythonhosted.org/packages/03/4b/8b9a1afde8072c4d5710d9fa91433d504325821b038e00237dc8d6d833dc/requests_ntlm-1.1.0-py2.py3-none-any.whl


6. Create windows host inventory like following for testing.

[wintel]
192.168.2.16

[wintel:vars]
ansible_user=administrator
ansible_password=Password@123
ansible_connection=winrm
ansible_winrm_server_cert_validation=ignore


7. Try to ping the Wintel host using Ansible ping module.

[root@ansible-server UnixArena_Project]# ansible all -i hosts_wintel -m win_ping
192.168.2.16 | SUCCESS => {
    "changed": false,
    "ping": "pong"
}
[root@ansible-server UnixArena_Project]#

We have got the ping pong result which confirms that Ansible is able to establish the connection with windows server.

We have successfully configured windows server to support ansible automation. Share it! Comment it !! Be Sociable !!

The post Ansible – Configure Windows servers as Ansible Client – winrm appeared first on UnixArena.

Jenkins Console – Xterm Terminal – Colorized Ansible playbook Output

$
0
0

This artcile will walk through the installing and configuring Ansicolor plugin in Jenkins to make colorized output in ansible playbook stdout. Jenkins console is very plain and simple. If you are using Jenkins to run the ansible playbook, you might notice that colorful output might be missing. Ansible Tower/AWX offers the colorful stdout in the consoles. We could turn Jenkins too post the similar output when you install AnsiColor plugin. This would turn Jenkins to bring the most familiar playbook color codes. (Green – OK,  Orange for – Changed, Red for Std Error ).


By default, we would get output like the following snap.

Ansible -Plain Jenkins console Output


Installing ANSI Color Plugin:

1. Login to Jenkins with admin privileges.


2. Navigate to Manage Jenkins.

Manage Jenkins - Install AnsiColor Plugin
Manage Jenkins – Install AnsiColor Plugin


3. Click on “Manage Plugins”.

Manage Plugins - Jenkins
Manage Plugins – Jenkins


4. Search for “AnsiColor” and select the plugin. Click on “Install without Restart”.

Select AnsiColor Plugin - Ansible - Jenkins
Select AnsiColor Plugin – Ansible – Jenkins


Configure ANSI Color Plugin in Job:

5. Navigate to Jenkins job which is integrated with Ansible playbook plugin.

Configure Job with Ansicolor plugin - Jenkins
Configure Job with Ansicolor plugin – Jenkins


6. Navigate to Build environment and check “Color ANSI Color Output”.

Enable ANSI color for Job - Jenkins
Enable ANSI color for Job – Jenkins


7. Click on Build and click on the “Advanced ” tab from “Invoke Ansible Playbook” plugin.

Invoke Ansible Playbook - Plugin
Invoke Ansible Playbook – Plugin


8. Select colorized stdout. Save the job.

Check - Colorized stdout - Jenkins - Ansible
Check – Colorized stdout – Jenkins – Ansible


Validate our work: 

9. It’s time for testing.  Execute “Build” and check for console output.

ANSIColor - Ansible stdout - Jenkins
ANSIColor – Ansible stdout – Jenkins


We have successfully installed and configured the ANSI Color plugin on Jenkins. We have got the beautiful colorized Ansible playbook output similar to AWX/ Ansible Tower.

The post Jenkins Console – Xterm Terminal – Colorized Ansible playbook Output appeared first on UnixArena.

Jenkins – Rename Build Job Names – Build Name setter

$
0
0

Jenkins job’s build name would be named with the numeric number by default in increment manner. After configuring the Jenkins job, the first build job would be named as “1”, the second job would be named as “2” and so on. Most of the cases, no one prefers to change the default build naming algorithm. In some cases, if you are using Jenkins for infrastructure automation or would like to carry each job execution with valid request/incident number, then you need to install build name setter plugin to achieve it. Let’s walk through how to configure the build name setter plugin and use it for jobs.


1. Login to Jenkins as administrator.


2. Click on Manage Jenkins from the Home page.

Manage Jenkins
Manage Jenkins


3. Click on “Manage Plugins” and search for Build Name setter plugin from “Available” tab.

Manage Plugins - Jenkins
Manage Plugins – Jenkins


4. Select the plugin and click on “Install without restart”.

Select Build Name Setter Plugin
Select the Build Name Setter Plugin


5. Click on “configure” Job.

Configure Job - Jenkins
Configure Job – Jenkins


6. You must create the parameter to enable the build Name setter. Configure the job with Request Number / Incident Number input variable.

Parameter - Capture Variable to set Build Number
Parameter – Capture Variable to set Build Number


6. Enable the Build name setter and provide the variable reference. Save the job.

Enable Build Name setter - variable sub
Enable Build Name setter – variable sub


7.  Trigger the build to validate our work. The job will prompt for Request Number / Incident number. Enter the Request number.

Trigger Build - Enter Request number
Trigger Build – Enter Request number


8. Once the job is completed, you could see that build number with request number which we have passed.

Build Job - Renamed with Request Number
Build Job – Renamed with Request Number


10. Build number would be helpful for auditing purpose.

Build Job - Build Name setter Result
Build Job – Build Name setter Result


At the same time, you can’t keep the artifacts within Jenkins for a long time to avoid the slowness.  In upcoming articles, we will see that how to get rid of the old build jobs and how to store artifacts in the local filesystem or remote system.

Hope this article is informative to you. Share it! Comment it!! Be Sociable !!!

The post Jenkins – Rename Build Job Names – Build Name setter appeared first on UnixArena.

Jenkins – Store Console Output in Linux Filesystem – Artifacts

$
0
0

How to store Jenkins job’s console output in another system?  There are much opensource software is available to store the logs and retrieve logs in time. Jfrog is one of the most famous artifact solutions. Here, we will be using native Linux/Unix commands to pull the Jenkins logs and store it in local/NFS filesystem for auditing purpose. Since these article series talks mainly about calling ansible playbooks via Jenkins, the console output is mostly the playbook results.


Required Plugins: 

1. Login to Jenkins and install the below-mentioned plugins.

Download & install Post Build Task Plugin

Download & install the Post Build Task Plugin

Configure the Time-stamp Plugin:

2. Navigate to the “Configure system”.

Configure System - Jenkins
Configure System – Jenkins


3. Adjust the timestamp parameter according to the need. Ensure there is no empty space left since we will be saving the logs using this value.

Modify the timestamp pattern - Eliminate Space
Modify the timestamp pattern – Eliminate Space


Configure the Existing Job: 

4. Pick any of the existing jobs and click on configure. Click on “Build Environment”  and check “secret text“.

Use Secret Texts & Bindings - Jenkins
Use Secret Texts & Bindings – Jenkins


Note: It’s a Jenkins read-only credentials which I have selected to read the Jenkins job. If you have configured project-based security, ensure this user has enough permission to read the console logs.


5. Click on the Post Build Action tab and Add “Post Build Task”. Copy & paste the following contents into the script tab. Save the job.   All the artifacts will be saved in directory “/home/ansible_artifacts/”.    This directory can be included in log rotation to move the older logs to the archive directory using cronjob.

/bin/wget --auth-no-challenge --user $JENKINS_USR --password $JENKINS_PASS -O /home/ansible_artifacts/${JOB_BASE_NAME}_${REQ_INC}.${BUILD_TIMESTAMP}_console_output.log ${BUILD_URL}consoleText

Example:

Add Post Build Action Plugin - Jenkins
Add Post Build Action Plugin – Jenkins


Test our work:

6. Let’s trigger the build and see how the artifacts work.  All the artifacts will be saved on the Jenkins server in the configured destination.

Build the project - Jenkins
Build the project – Jenkins


7. Here the console logs which shows that artifacts are stored in the configured location.

Storing Artificats - Jenkins
Storing Artifacts – Jenkins


8. Login to the Jenkins server and check the logs generated by the job.

[root@ansible-server ansible_artifacts]# ls -lrt
total 4
-rw-r--r-- 1 jenkins jenkins 1793 Feb 26 08:03 Invoke_Ansible_Playbook_df_check_REQU1234.2019-02-26-08:03:11_console_output.log
[root@ansible-server ansible_artifacts]# pwd
/home/ansible_artifacts
[root@ansible-server ansible_artifacts]# 


9. Let’s view the log.

[root@ansible-server ansible_artifacts]# more Invoke_Ansible_Playbook_df_check_REQU1234.2019-02-26-08\:03\:11_console_output.log
Started by user admin
Building on master in workspace /var/lib/jenkins/workspace/UnixArena_Project/Invoke_Ansible_Playbook_df_check
Set build name.
New build name is 'REQU1234'
[Invoke_Ansible_Playbook_df_check] $ sshpass ******** /usr/bin/ansible-playbook /var/lib/awx/projects/UnixArena_Project/Unix_Arena_Demo_df.yaml -i /v
ar/lib/awx/projects/UnixArena_Project/temp.hosts -f 5 -u **** -k -e FS_NAME=/var

PLAY [all] *********************************************************************

TASK [Root FS usage] ***********************************************************
changed: [192.168.3.151]

TASK [debug] *******************************************************************
ok: [192.168.3.151] => {
    "msg": "System 192.168.3.151's /var FS utiliation is 64%"
}

PLAY RECAP *********************************************************************
192.168.3.151              : ok=2    changed=1    unreachable=0    failed=0

Set build name.
New build name is 'REQU1234'
Performing Post build task...
Match found for :build : True
Logical operation result is TRUE
Running script  : /bin/wget --auth-no-challenge --user $JENKINS_USR --**** $JENKINS_PASS -O /home/ansible_artifacts/${JOB_BASE_NAME}_${REQ_INC}.${BUI
LD_TIMESTAMP}_console_output.log ${BUILD_URL}consoleText
[Invoke_Ansible_Playbook_df_check] $ /bin/sh -xe /tmp/jenkins8751864532556574210.sh
+ /bin/wget --auth-no-challenge --user **** --**** **** -O /home/ansible_artifacts/Invoke_Ansible_Playbook_df_check_REQU1234.2019-02-26-08:03:11_cons
ole_output.log http://192.168.3.151:8080/job/UnixArena_Project/job/Invoke_Ansible_Playbook_df_check/24/consoleText
--2019-02-26 08:03:14--  http://192.168.3.151:8080/job/UnixArena_Project/job/Invoke_Ansible_Playbook_df_check/24/consoleText
Connecting to 192.168.3.151:8080... connected.
[root@ansible-server ansible_artifacts]#


We have successfully configured artifacts within the Jenkins server on the given path. Hope this article is informative to you.


Share it! Comment it!! Be Sociable !!!

The post Jenkins – Store Console Output in Linux Filesystem – Artifacts appeared first on UnixArena.

Jenkins – Ansible – Configure Dynamic Inventory

$
0
0

Are you using Jenkins as front-end GUI for Ansible Automation?  Have you ever tried the dynamic inventory in Jenkin’s Ansible plugin? Ansible Inventory can be created using the plugin’s dynamic inventory feature. This feature could be very useful when you want to pass hosts as user-defined input and that’s is not part any of the inventory lists. In some of the cases, we will hide the master inventory to prevent accidental playbook execution against those. This could also be useful when you want to run a playbook against newly built servers which might not part of the inventory.

To know more about Ansible Dynamic Inventory, please check it in Ansible Documentation.


1. Login to Jenkins console.


2. Click on the configure Jenkins Job which is associated with Ansible plugin.


3. Select “inline content” from the “Invoke Ansible Playbook” plugin.

Invoke Ansible Playbook - Inline content
Invoke Ansible Playbook – Inline content


4. Enter the desired variable name.

Invoke Ansible Playbook - Inline content
Invoke Ansible Playbook – Inline content


5. Navigate to the general tab to configure “INVENTORY” variable as an input parameter.  This is the Multi-line String Parameter tab to accommodate many hosts.

Parameterized - Inventory Passing
Parameterized – Inventory Passing


6. Trigger the Jenkins Job. Enter the required variable values. In the Inventory tab, you could copy & paste the host’s list.  Note: Playbook has written with “hosts: all ” to accommodate any hosts.

Inventory - Passing - Jenkins
Inventory – Passing – Jenkins


7. Here is the console output of the triggered job.

Dynamic Inventory passing - Execution
Dynamic Inventory passing – Execution


We have successfully executed the playbook against the host which was not part of any inventories. Inventory has been dynamically created using the user-defined input (Parameterized Build).  Hope this article informative to you.


Share it! Comment it!! Be Sociable !!!

The post Jenkins – Ansible – Configure Dynamic Inventory appeared first on UnixArena.

VMware Template Automation Using Packer – Redhat/CentOS

$
0
0

VMware template creation can be automated using packer. VMware Virtual Machine deployments are very faster because of the template based VM build. But due to rapid development and fast-paced Operating system releases, we might need to build multiple templates and keep it ready for deployment. A customer might ask different operating system release and you should be ready the prebuilt templates. In this article, we will walk through the VMware vSphere Template creation for Redhat/CentOS using Packer.


Download the following components:


On Your Laptop/Desktop,

1. Create a new directory and copy all the downloaded components. RHEL/ CentOS ISO should be kept 0n VMware vSphere’s datastore.

Packer Executable
Packer Executable


2. Open a notepad and paste the following contents to it. Edit all the required values according to your infrastructure. Save this file as CentOS7_build.json on the same directory.

{
  "builders": [
    {
      "type": "vsphere-iso",

      "vcenter_server":      "192.168.2.212",
      "username":            "administrator@vsphere.local",
      "password":            "test@123",
      "insecure_connection": "true",
      "vm_name": "RHEL-Template",
      "notes": "Build via Packer",
      "datacenter": "STACK-BLR",
      "cluster": "UA-CLS",
      "host": "192.168.2.211",
      "datastore": "DATASTORE-BLR",
      "network": "VM Network",
      "resource_pool": "UA-ResPool",

      "guest_os_type": "centos7_64Guest",

      "ssh_username": "root",
      "ssh_password": "server",

      "CPUs":             1,
      "RAM":              1024,
      "RAM_reserve_all": false,

      "convert_to_template": true,

      "disk_controller_type":  "pvscsi",
      "disk_size":        25000,
      "disk_thin_provisioned": true,

      "network_card": "vmxnet3",

      "iso_paths": [
        "[DATASTORE-BLR] ISO/centos7_64.iso"
      ],
      "iso_checksum": "5b61d5b378502e9cba8ba26b6696c92a",
      "iso_checksum_type": "md5",
      "floppy_files": [
        "{{template_dir}}/ks.cfg"
      ],
      "boot_command": " <esc> <wait> linux inst.text inst.ks=hd:fd0:/ks.cfg <enter> " 
          }
  ]
}

You might need to update the value for almost all the fields except the boot_command, networ_card, disk_controller_type, and provision type.


3. You need to prepare traditional kickstart file to define the package selection and other configuration. Download this kickstart file for RHEL 7 / CentOS 7. Please feel free to modify and update the kickstart file according to our need.

  • Root Credentials – root/server
  • User – admin/admin123


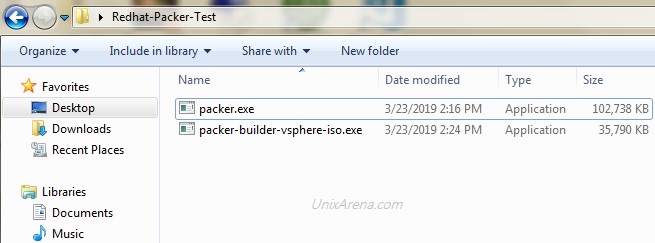
4. Here is the snapshot of the directory contents.

Packer - Directory contents
Packer – Directory contents


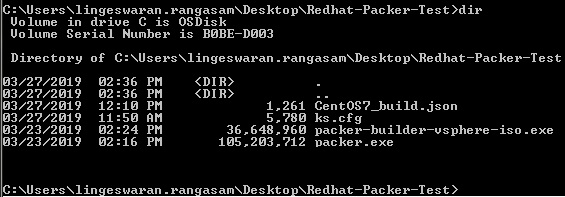
5. Open command prompt – Start – > cmd – > Enter. Navigate to the directory which we have created for this VM build.

Packer - Directory contents
Packer – Directory contents


6. Trigger the packer build job using the following command. At this stage, the VM job is waiting for VM to boot with IP.

C:\Users\lingeswaran.rangasam\Desktop\packer\Redhat-Packer-Test>packer.exe build CentOS7_build.json
vsphere-iso output will be in this color.

==> vsphere-iso: Creating VM...
==> vsphere-iso: Customizing hardware...
==> vsphere-iso: Mount ISO images...
==> vsphere-iso: Creating floppy disk...
    vsphere-iso: Copying files flatly from floppy_files
    vsphere-iso: Copying file: C:\Users\lingeswaran.rangasam\Desktop\packer\Redhat-Packer-Test/ks.cfg
    vsphere-iso: Done copying files from floppy_files
    vsphere-iso: Collecting paths from floppy_dirs
    vsphere-iso: Resulting paths from floppy_dirs : []
    vsphere-iso: Done copying paths from floppy_dirs
==> vsphere-iso: Uploading created floppy image
==> vsphere-iso: Adding generated Floppy...
==> vsphere-iso: Set boot order temporary...
==> vsphere-iso: Power on VM...
==> vsphere-iso: Waiting 10s for boot...
==> vsphere-iso: Typing boot command...
==> vsphere-iso: Waiting for IP...
==> vsphere-iso: IP address: 192.168.2.67
==> vsphere-iso: Using ssh communicator to connect: 192.168.2.67
==> vsphere-iso: Waiting for SSH to become available...
==> vsphere-iso: Connected to SSH!
==> vsphere-iso: Shut down VM...
==> vsphere-iso: Deleting Floppy drives...
==> vsphere-iso: Deleting Floppy image...
==> vsphere-iso: Eject CD-ROM drives...
==> vsphere-iso: Convert VM into template...
==> vsphere-iso: Clear boot order...
Build 'vsphere-iso' finished.

==> Builds finished. The artifacts of successful builds are:
--> vsphere-iso: RHEL-Template

C:\Users\lingeswaran.rangasam\Desktop\packer\Redhat-Packer-Test>


7.  Login to VMware vCenter and navigate to template section. Here you can see the Packer generated template.

VMware vSphere - VM template - Packer
VMware vSphere – VM template – Packer


We have successfully built CentOS/RHEL 7.x VM and concerted into VMware VM template using Packer. If you do not want to convert into a VM template, Refer the REHL/CentOS VM build using ISO – Packer.

Hope this article is informative to you.  Share it! Comment it!! Be Sociable!!!

The post VMware Template Automation Using Packer – Redhat/CentOS appeared first on UnixArena.


VMware vSphere – Build VM using Terraform – Cent OS/RHEL (Redhat Linux)

$
0
0

This article will provide step by step procedure for building  “CentOS” /”Redhat Linux” Virtual Machine using Terraform tool on the VMware vSphere environment.  Terraform is an excellent tool to build VM’s on VMware vSphere environment.  Terraform doesn’t require any dedicated host. You could download an opensource/free version of Terraform on your laptop or desktop and trigger the VM builds.  Terraform uses HCL (Hasicorp Language) which requires very few lines to create VM. Terraform is developed widely by the open source community and HashiCorp. It is an open source tool that codifies APIs into declarative configuration files that can be shared amongst team members, treated as code, edited, reviewed, and versioned.


Environment:

  • Windows 7 Laptop
  • VMware vSphere: 6.0 / 6.5


Terraform – VM build – CentOS 

1. Download Terraform executable from Terraform.io.  I have downloaded windows 64-bit Terraform executable.


2. Create a new directory and copy terraform.exe into that.

Terraform - Download
Terraform – Download


3. Download the attached Terraform JSON file and save it in the same directory with “*.tf” file extension. Edit the following fields according to your requirement.

  • STACK-BLR” – DataCenter Name
  • DATASTORE-BLR” – Datastore Name
  • UA-ResPool” – Resource Pool. (If you do not have resource pool, remove the code block)
  • VM Network” – vSphere VM network
  • CentOS-Template” – VM template name
  • terraform-test” – New Virtual Machine Name
  • terraform-test” – Hostname (OS Level)
  • ncpu“, “Memory“, “disk (size )” adjust as per your requirement.


4. Create one more file to accommodate the variables (file name- “terraform.tfvars”). This is just to separate the credentials from actual code.

vsphere_user="administrator@vsphere.local"
vsphere_password="password@123"
vsphere_server="192.168.2.212"


5. List the directory contents.

Terraform - Resources

Terraform – Resources

  • Open a command prompt and navigate to the terraform directory.
Microsoft Windows [Version 6.1.7601]
Copyright (c) 2009 Microsoft Corporation.  All rights reserved.
C:\Users\lingeswaran.rangasam>cd Desktop
C:\Users\lingeswaran.rangasam\Desktop>cd terraform

6. Initialize the terraform resources. This will download the required terraform plugins which are required for VM build.

C:\Users\lingeswaran.rangasam\Desktop\terraform>terraform.exe init

Initializing provider plugins...
- Checking for available provider plugins on https://releases.hashicorp.com...
- Downloading plugin for provider "vsphere" (1.10.0)...

The following providers do not have any version constraints in configuration,
so the latest version was installed.

To prevent automatic upgrades to new major versions that may contain breaking
changes, it is recommended to add version = "..." constraints to the
corresponding provider blocks in configuration, with the constraint strings
suggested below.

* provider.vsphere: version = "~> 1.10"

Terraform has been successfully initialized!

You may now begin working with Terraform. Try running "terraform plan" to see
any changes that are required for your infrastructure. All Terraform commands
should now work.

If you ever set or change modules or backend configuration for Terraform,
rerun this command to reinitialize your working directory. If you forget, other
commands will detect it and remind you to do so if necessary.

C:\Users\lingeswaran.rangasam\Desktop\terraform>


7. Let’s run the dry run. – Terraform plan.

C:\Users\lingeswaran.rangasam\Desktop\terraform>terraform.exe plan
Refreshing Terraform state in-memory prior to plan...
The refreshed state will be used to calculate this plan, but will not be
persisted to local or remote state storage.

data.vsphere_datacenter.dc: Refreshing state...
data.vsphere_resource_pool.pool: Refreshing state...
data.vsphere_network.network: Refreshing state...
data.vsphere_virtual_machine.template: Refreshing state...
data.vsphere_datastore.datastore: Refreshing state...

------------------------------------------------------------------------

An execution plan has been generated and is shown below.
Resource actions are indicated with the following symbols:
  + create

Terraform will perform the following actions:

  + vsphere_virtual_machine.vm
      id:                                                   
      boot_retry_delay:                                     "10000"
      change_version:                                       
      clone.#:                                              "1"
      clone.0.customize.#:                                  "1"
      clone.0.customize.0.ipv4_gateway:                     "192.168.2.1"
      clone.0.customize.0.linux_options.#:                  "1"
      clone.0.customize.0.linux_options.0.domain:           "local.localdomain"
      clone.0.customize.0.linux_options.0.host_name:        "terraform-test"
      clone.0.customize.0.linux_options.0.hw_clock_utc:     "true"
      clone.0.customize.0.network_interface.#:              "1"
      clone.0.customize.0.network_interface.0.ipv4_address: "191.168.2.191"
      clone.0.customize.0.network_interface.0.ipv4_netmask: "24"
      clone.0.customize.0.timeout:                          "10"
      clone.0.template_uuid:                                "4222a808-3a1f-0662-635a-21bd41ad90b1"
      clone.0.timeout:                                      "30"
      cpu_limit:                                            "-1"
      cpu_share_count:                                      
      cpu_share_level:                                      "normal"
      datastore_id:                                         "datastore-81"
      default_ip_address:                                   
      disk.#:                                               "1"
      disk.0.attach:                                        "false"
      disk.0.datastore_id:                                  ""
      disk.0.device_address:                                
      disk.0.disk_mode:                                     "persistent"
      disk.0.disk_sharing:                                  "sharingNone"
      disk.0.eagerly_scrub:                                 "false"
      disk.0.io_limit:                                      "-1"
      disk.0.io_reservation:                                "0"
      disk.0.io_share_count:                                "0"
      disk.0.io_share_level:                                "normal"
      disk.0.keep_on_remove:                                "false"
      disk.0.key:                                           "0"
      disk.0.label:                                         "disk0"
      disk.0.path:                                          
      disk.0.size:                                          "50"
      disk.0.thin_provisioned:                              "true"
      disk.0.unit_number:                                   "0"
      disk.0.uuid:                                          
      disk.0.write_through:                                 "false"
      ept_rvi_mode:                                         "automatic"
      firmware:                                             "bios"
      force_power_off:                                      "true"
      guest_id:                                             "centos7_64Guest"
      guest_ip_addresses.#:                                 
      host_system_id:                                       
      hv_mode:                                              "hvAuto"
      imported:                                             
      latency_sensitivity:                                  "normal"
      memory:                                               "750"
      memory_limit:                                         "-1"
      memory_share_count:                                   
      memory_share_level:                                   "normal"
      migrate_wait_timeout:                                 "30"
      moid:                                                 
      name:                                                 "terraform-test"
      network_interface.#:                                  "1"
      network_interface.0.adapter_type:                     "vmxnet3"
      network_interface.0.bandwidth_limit:                  "-1"
      network_interface.0.bandwidth_reservation:            "0"
      network_interface.0.bandwidth_share_count:            
      network_interface.0.bandwidth_share_level:            "normal"
      network_interface.0.device_address:                   
      network_interface.0.key:                              
      network_interface.0.mac_address:                      
      network_interface.0.network_id:                       "network-30"
      num_cores_per_socket:                                 "1"
      num_cpus:                                             "1"
      reboot_required:                                      
      resource_pool_id:                                     "resgroup-84"
      run_tools_scripts_after_power_on:                     "true"
      run_tools_scripts_after_resume:                       "true"
      run_tools_scripts_before_guest_shutdown:              "true"
      run_tools_scripts_before_guest_standby:               "true"
      scsi_bus_sharing:                                     "noSharing"
      scsi_controller_count:                                "1"
      scsi_type:                                            "pvscsi"
      shutdown_wait_timeout:                                "3"
      swap_placement_policy:                                "inherit"
      uuid:                                                 
      vapp_transport.#:                                     
      vmware_tools_status:                                  
      vmx_path:                                             
      wait_for_guest_ip_timeout:                            "0"
      wait_for_guest_net_routable:                          "true"
      wait_for_guest_net_timeout:                           "5"


Plan: 1 to add, 0 to change, 0 to destroy.

------------------------------------------------------------------------

Note: You didn't specify an "-out" parameter to save this plan, so Terraform
can't guarantee that exactly these actions will be performed if
"terraform apply" is subsequently run.

C:\Users\lingeswaran.rangasam\Desktop\terraform>


8. Build the VM if the dry run looks good. Trigger the “terraform apply” to create the resource.

C:\Users\lingeswaran.rangasam\Desktop\terraform>terraform.exe apply
data.vsphere_datacenter.dc: Refreshing state...
data.vsphere_datastore.datastore: Refreshing state...
data.vsphere_resource_pool.pool: Refreshing state...
data.vsphere_virtual_machine.template: Refreshing state...
data.vsphere_network.network: Refreshing state...
vsphere_virtual_machine.vm: Refreshing state... (ID: 4222962d-c1c7-2ba8-51bd-dc516ea85089)

An execution plan has been generated and is shown below.
Resource actions are indicated with the following symbols:
  + create

Terraform will perform the following actions:

  + vsphere_virtual_machine.vm
      id:                                                   
      boot_retry_delay:                                     "10000"
      change_version:                                       
      clone.#:                                              "1"
      clone.0.customize.#:                                  "1"
      clone.0.customize.0.ipv4_gateway:                     "192.168.2.1"
      clone.0.customize.0.linux_options.#:                  "1"
      clone.0.customize.0.linux_options.0.domain:           "local.localdomain"
      clone.0.customize.0.linux_options.0.host_name:        "terraform-test"
      clone.0.customize.0.linux_options.0.hw_clock_utc:     "true"
      clone.0.customize.0.network_interface.#:              "1"
      clone.0.customize.0.network_interface.0.ipv4_address: "192.168.2.73"
      clone.0.customize.0.network_interface.0.ipv4_netmask: "24"
      clone.0.customize.0.timeout:                          "10"
      clone.0.template_uuid:                                "4222d114-c80f-d077-bd7b-6b2cb7ffe462"
      clone.0.timeout:                                      "30"
      cpu_limit:                                            "-1"
      cpu_share_count:                                      
      cpu_share_level:                                      "normal"
      datastore_id:                                         "datastore-81"
      default_ip_address:                                   
      disk.#:                                               "1"
      disk.0.attach:                                        "false"
      disk.0.datastore_id:                                  ""
      disk.0.device_address:                                
      disk.0.disk_mode:                                     "persistent"
      disk.0.disk_sharing:                                  "sharingNone"
      disk.0.eagerly_scrub:                                 "false"
      disk.0.io_limit:                                      "-1"
      disk.0.io_reservation:                                "0"
      disk.0.io_share_count:                                "0"
      disk.0.io_share_level:                                "normal"
      disk.0.keep_on_remove:                                "false"
      disk.0.key:                                           "0"
      disk.0.label:                                         "disk0"
      disk.0.path:                                          
      disk.0.size:                                          "50"
      disk.0.thin_provisioned:                              "true"
      disk.0.unit_number:                                   "0"
      disk.0.uuid:                                          
      disk.0.write_through:                                 "false"
      ept_rvi_mode:                                         "automatic"
      firmware:                                             "bios"
      force_power_off:                                      "true"
      guest_id:                                             "centos7_64Guest"
      guest_ip_addresses.#:                                 
      host_system_id:                                       
      hv_mode:                                              "hvAuto"
      imported:                                             
      latency_sensitivity:                                  "normal"
      memory:                                               "1024"
      memory_limit:                                         "-1"
      memory_share_count:                                   
      memory_share_level:                                   "normal"
      migrate_wait_timeout:                                 "30"
      moid:                                                 
      name:                                                 "terraform-test"
      network_interface.#:                                  "1"
      network_interface.0.adapter_type:                     "vmxnet3"
      network_interface.0.bandwidth_limit:                  "-1"
      network_interface.0.bandwidth_reservation:            "0"
      network_interface.0.bandwidth_share_count:            
      network_interface.0.bandwidth_share_level:            "normal"
      network_interface.0.device_address:                   
      network_interface.0.key:                              
      network_interface.0.mac_address:                      
      network_interface.0.network_id:                       "network-30"
      num_cores_per_socket:                                 "1"
      num_cpus:                                             "1"
      reboot_required:                                      
      resource_pool_id:                                     "resgroup-84"
      run_tools_scripts_after_power_on:                     "true"
      run_tools_scripts_after_resume:                       "true"
      run_tools_scripts_before_guest_shutdown:              "true"
      run_tools_scripts_before_guest_standby:               "true"
      scsi_bus_sharing:                                     "noSharing"
      scsi_controller_count:                                "1"
      scsi_type:                                            "pvscsi"
      shutdown_wait_timeout:                                "3"
      swap_placement_policy:                                "inherit"
      uuid:                                                 
      vapp_transport.#:                                     
      vmware_tools_status:                                  
      vmx_path:                                             
      wait_for_guest_ip_timeout:                            "0"
      wait_for_guest_net_routable:                          "true"
      wait_for_guest_net_timeout:                           "5"


Plan: 1 to add, 0 to change, 0 to destroy.

Do you want to perform these actions?
  Terraform will perform the actions described above.
  Only 'yes' will be accepted to approve.

  Enter a value: yes

vsphere_virtual_machine.vm: Creating...
  boot_retry_delay:                                     "" => "10000"
  change_version:                                       "" => ""
  clone.#:                                              "" => "1"
  clone.0.customize.#:                                  "" => "1"
  clone.0.customize.0.ipv4_gateway:                     "" => "192.168.2.1"
  clone.0.customize.0.linux_options.#:                  "" => "1"
  clone.0.customize.0.linux_options.0.domain:           "" => "local.localdomain"
  clone.0.customize.0.linux_options.0.host_name:        "" => "terraform-test"
  clone.0.customize.0.linux_options.0.hw_clock_utc:     "" => "true"
  clone.0.customize.0.network_interface.#:              "" => "1"
  clone.0.customize.0.network_interface.0.ipv4_address: "" => "192.168.2.73"
  clone.0.customize.0.network_interface.0.ipv4_netmask: "" => "24"
  clone.0.customize.0.timeout:                          "" => "10"
  clone.0.template_uuid:                                "" => "4222d114-c80f-d077-bd7b-6b2cb7ffe462"
  clone.0.timeout:                                      "" => "30"
  cpu_limit:                                            "" => "-1"
  cpu_share_count:                                      "" => ""
  cpu_share_level:                                      "" => "normal"
  datastore_id:                                         "" => "datastore-81"
  default_ip_address:                                   "" => ""
  disk.#:                                               "" => "1"
  disk.0.attach:                                        "" => "false"
  disk.0.datastore_id:                                  "" => ""
  disk.0.device_address:                                "" => ""
  disk.0.disk_mode:                                     "" => "persistent"
  disk.0.disk_sharing:                                  "" => "sharingNone"
  disk.0.eagerly_scrub:                                 "" => "false"
  disk.0.io_limit:                                      "" => "-1"
  disk.0.io_reservation:                                "" => "0"
  disk.0.io_share_count:                                "" => "0"
  disk.0.io_share_level:                                "" => "normal"
  disk.0.keep_on_remove:                                "" => "false"
  disk.0.key:                                           "" => "0"
  disk.0.label:                                         "" => "disk0"
  disk.0.path:                                          "" => ""
  disk.0.size:                                          "" => "50"
  disk.0.thin_provisioned:                              "" => "true"
  disk.0.unit_number:                                   "" => "0"
  disk.0.uuid:                                          "" => ""
  disk.0.write_through:                                 "" => "false"
  ept_rvi_mode:                                         "" => "automatic"
  firmware:                                             "" => "bios"
  force_power_off:                                      "" => "true"
  guest_id:                                             "" => "centos7_64Guest"
  guest_ip_addresses.#:                                 "" => ""
  host_system_id:                                       "" => ""
  hv_mode:                                              "" => "hvAuto"
  imported:                                             "" => ""
  latency_sensitivity:                                  "" => "normal"
  memory:                                               "" => "1024"
  memory_limit:                                         "" => "-1"
  memory_share_count:                                   "" => ""
  memory_share_level:                                   "" => "normal"
  migrate_wait_timeout:                                 "" => "30"
  moid:                                                 "" => ""
  name:                                                 "" => "terraform-test"
  network_interface.#:                                  "" => "1"
  network_interface.0.adapter_type:                     "" => "vmxnet3"
  network_interface.0.bandwidth_limit:                  "" => "-1"
  network_interface.0.bandwidth_reservation:            "" => "0"
  network_interface.0.bandwidth_share_count:            "" => ""
  network_interface.0.bandwidth_share_level:            "" => "normal"
  network_interface.0.device_address:                   "" => ""
  network_interface.0.key:                              "" => ""
  network_interface.0.mac_address:                      "" => ""
  network_interface.0.network_id:                       "" => "network-30"
  num_cores_per_socket:                                 "" => "1"
  num_cpus:                                             "" => "1"
  reboot_required:                                      "" => ""
  resource_pool_id:                                     "" => "resgroup-84"
  run_tools_scripts_after_power_on:                     "" => "true"
  run_tools_scripts_after_resume:                       "" => "true"
  run_tools_scripts_before_guest_shutdown:              "" => "true"
  run_tools_scripts_before_guest_standby:               "" => "true"
  scsi_bus_sharing:                                     "" => "noSharing"
  scsi_controller_count:                                "" => "1"
  scsi_type:                                            "" => "pvscsi"
  shutdown_wait_timeout:                                "" => "3"
  swap_placement_policy:                                "" => "inherit"
  uuid:                                                 "" => ""
  vapp_transport.#:                                     "" => ""
  vmware_tools_status:                                  "" => ""
  vmx_path:                                             "" => ""
  wait_for_guest_ip_timeout:                            "" => "0"
  wait_for_guest_net_routable:                          "" => "true"
  wait_for_guest_net_timeout:                           "" => "5"
vsphere_virtual_machine.vm: Still creating... (10s elapsed)
vsphere_virtual_machine.vm: Still creating... (20s elapsed)
vsphere_virtual_machine.vm: Still creating... (30s elapsed)
vsphere_virtual_machine.vm: Still creating... (40s elapsed)
vsphere_virtual_machine.vm: Still creating... (50s elapsed)
vsphere_virtual_machine.vm: Still creating... (1m0s elapsed)
vsphere_virtual_machine.vm: Still creating... (1m10s elapsed)
vsphere_virtual_machine.vm: Still creating... (1m20s elapsed)
vsphere_virtual_machine.vm: Still creating... (1m30s elapsed)
vsphere_virtual_machine.vm: Still creating... (1m40s elapsed)
vsphere_virtual_machine.vm: Still creating... (1m50s elapsed)
vsphere_virtual_machine.vm: Still creating... (2m0s elapsed)
vsphere_virtual_machine.vm: Still creating... (2m10s elapsed)
vsphere_virtual_machine.vm: Still creating... (2m20s elapsed)
vsphere_virtual_machine.vm: Still creating... (2m30s elapsed)
vsphere_virtual_machine.vm: Still creating... (2m40s elapsed)
vsphere_virtual_machine.vm: Still creating... (2m50s elapsed)
vsphere_virtual_machine.vm: Still creating... (3m0s elapsed)
vsphere_virtual_machine.vm: Still creating... (3m10s elapsed)
vsphere_virtual_machine.vm: Still creating... (3m20s elapsed)
vsphere_virtual_machine.vm: Still creating... (3m30s elapsed)
vsphere_virtual_machine.vm: Still creating... (3m40s elapsed)
vsphere_virtual_machine.vm: Still creating... (3m50s elapsed)
vsphere_virtual_machine.vm: Still creating... (4m0s elapsed)
vsphere_virtual_machine.vm: Creation complete after 4m1s (ID: 42225886-95b8-2fa0-c28e-0fe0d35b2a99)

Apply complete! Resources: 1 added, 0 changed, 0 destroyed.

C:\Users\lingeswaran.rangasam\Desktop\terraform>


VMware vCenter Console: 

During the build, you can navigate to the vCenter console to check the build progress. Log in to the vCenter console.

1. Check the current tasks (Check immediately after triggering the terraform apply.).

Terraform VM build - UnixArena
Terraform VM build – UnixArena


2. Here you can see that VM is created and build is in progress.

Terraform VM build - UnixArena - console
Terraform VM build – UnixArena – console


Once the terraform Job is completed, you are good to login to the VM and check the status.

VM console - CentOS - VMware
VM console – CentOS – VMware


We have successfully built CentOS 7.x / RHEL 7.x using Terraform code.  Using Terraform Provisioners, we can also perform the post-build steps if needed.

The post VMware vSphere – Build VM using Terraform – Cent OS/RHEL (Redhat Linux) appeared first on UnixArena.

What is Kubernetes – Good to Know – An Overview

$
0
0

Kubernetes is a leading container orchestration platform for automating application deployment, scaling, and management. Container brings a lot of scalability challenges. But Kubernetes can take over the challenges and lets you concentrate only on deployments. Its platform agnostic. Kubernetes is most often used to manage the Docker. But it can also work with any container system that packaged in Open Container Initiative (OCI) standards for container image formats and runtimes. I would like to answers some of the most frequent questions asked about Kubernetes in forums.

  • What is Kubernetes used for? What is docker? Why so often related to it?
  • Why it’s named as Kubernetes?
  • Is it written in “C” Language ? or  “C ++” ? 
  • Is it free? is it free for commercial use too?  
  • What is Openshift? How it’s related to Kubernetes? 
  • What are the Kubernetes variants exists today? 

I also would like to share some interesting facts about Kubernetes in a shorter note.


Origin of Kubernetes: 

Kubernetes is originally designed by Google Inc in 2014. It’s founded by Joe Beda, Brendan Burns, Craig McLuckie and Brian Grant, Hockin from Google Inc. Kubernetes most of the parts are heavily influenced by Google’s Borg system which is written in C++ language. Borg is Google’s internal container-oriented cluster-management system for a decade (Closed Source). Google’s Borg is the Predecessor to Kubernetes. 

https://github.com/kubernetes/kubernetes

Kubernetes Origin
Kubernetes Origin

Learn more about Borg, Omega and Kubernetes. 

How Kubernetes become very famous in a short span of time?

Google has donated Kubernetes to CNCF(Cloud Native Computing Foundation) in 2014 (Open Source). Kubernetes is written in GO/GoLang Language and v1.0 was released in 2015. Since its an opensource, the rapid development took a place to add more features. Different flavors of Kubernetes exists today and Openshift is one of the popular flavors from Redhat. Google is running everything in a container and spinning 3000 containers in a second (Offcourse they were doing from decade !!!).  Docker maturity and Cloud revolution have strengthened Kubernetes or vice-versa !.

Application Containers - Trend
Application Containers – Trend – Credit – https://451research.com


Why it’s named as Kubernetes?

Kubernetes(κυβερνήτης) is a Greek word.  Since this product manages the containers, developers might felt that Kubernetes is the right name for it. In English – > “Helmsman” < the person who steers a ship.

Kubernetes - Ship captain
Kubernetes – Captain of the ship


How the Kubernetes logo designed?

In initial product development days, Kubernetes was named as “Seven of Nine: Voyager”  who’s a former Borg drone. Borg is a code name for Google’s internal version of Kubernetes. To keep track of seven, The Kubernetes logo has seven sides.

Kubernetes Logo
Kubernetes Logo


Why Kubernetes also called as K8s?  

It’s simple.  K U B E R N E T E S  = k8s. It’s just short name(Stylished name) of Kubernetes.

K8s
K8s


Is Kubernetes free for commercial use?

Under  Apache License 2.0, Kubernetes is free to use and distribute.


What is Openshift? How it’s related to Kubernetes?

Openshift is just a Kubernetes variant from Redhat. Redhat Operates Openshift in Cloud and On-premise version. Compare to Kubernetes, Openshift is hardened more and offers Secure Kubernetes platform. Openshift also has upstream open source project. It’s available in the name of OKD (Origin Kubernetes distribution).

Here are the different Openshift offerings from Redhat.

Openshift Offerings - Kubernetes
Openshift Offerings – Kubernetes


What are the Kubernetes variants exists today?

Kubernetes Certified Partners
Kubernetes- Conformance Partners


Kubernetes Alternatives :

  • Docker Swarm
  • Apache Mesos


Check out solutions according to your requirement.


Hope this article is informative to you. In upcoming articles, we will discuss various Kubernetes components.

Share it! Comment it!! Be Sociable !!!

The post What is Kubernetes – Good to Know – An Overview appeared first on UnixArena.

How Kubernetes works ? – Core Components and Architecture

$
0
0

Kubernetes is an open-source generic multi-container management software which offers deployment, scaling, descaling & load balancing. It’s an orchestrator for microservices applications.  Kubernetes would make us see the whole data center as a computer. Kubernetes can manage any type of containers which follows  OCI standards. ( Docker or Core OS’s rkt or any ).  Kubernetes keys features are automated scheduling, self-healing capabilities, automated rollouts and rollbacks, horizontal scaling and load balancing.


Kubernetes Architecture consists of two key components  –  Master node and  Worker nodes (Minions).

K8s Master - Node - Cluster

K8s Master – Node – Cluster 

Master Node  – The Kubernetes Control Plane

Master node works like a Manager who manages the team to spin multiple workloads or similar to a football coach who had great control on his team.  Master nodes are in-charge and make the global decisions that which nodes to work on the requests. Multi-Master setup is also possible in Kubernetes to eliminate the single point of failure (Multi-Master HA). The master node runs only on Linux but not limited any specific platform. It could be bare metal, VM, OpenStack instance or any cloud instances.  Do not run user containers on the master node.

Master - In Charge for K8s Cluster
Master – In Charge for K8s Cluster


Master Node’s Components: 

The master node has the following components.

  • kube-apiserver

Kube-apiserver follows scale-out architecture. kube-apiserver is a front end to the control plane of the master node. It provides the external facing interface to communicate with the world via REST API. The Kube-apiserver also makes sure that there is communication established between the Nodes and the master components.


  • etcd – The Cluster Store: 

etcd is a mission-critical distributed key-value store. It provides a reliable way to store data across the kubernetes cluster and representing the state of the cluster at any given point in time.  Kubernetes uses etcd as a source of truth for the cluster. So, you must have a solid backup plan for it.

K8s Master Node components


  • kube-controller-manager

Kube-Controller Manager is a controller of controllers. It’s a daemon that embeds controllers and does namespace creation and garbage collection. It owns the responsibility and communicates with the API server to manage the end-points. Kube-controller-manager controls the following controllers.

  • Node Controller  – Manages the Node  (Create, Update & delete)
  • Replication controller – Maintains the number of pods as per manifest.
  • Service Account & Token controller – Create default accounts and API tokens for new namespaces.
  • Endpoints Controller – Take cares of endpoint objects (services, pods)


  • kube-scheduler

The kube-scheduler keeps watches apiserver for new pods requirement. It is responsible for distributing the workload to the worker node.  It keeps track of all the worker node’s resource utilization. So, It takes the logical decision based on the new pod’s resource requirement and existing worker node’s load. Kube-scheduler also needs to think about the rules that we define (affinity, anti-affinity, constraints).


Nodes a.k.a Minions – The Kubernetes Workers:

Nodes are a lot simpler than the master node. It’s a faceless and characterless system which simply does what master node says. If the node fails or died, we can simply swap it with a new machine to restore the business as usual. In other words, the node provides all the necessary services to run pods on it.  Nodes can be a bare-metal, Virtual machine, OpenStack instance or cloud instances.

Kubernetes Node
Kubernetes Node


Nodes consist of the following components:

  • Kubelet  – Main Kuberbernets agent

This is an agent service which runs on each node and enables the slave to communicate with the master. It registers the node with cluster and watches the master kubeapiserver for the work assignment. It instantiates pods and reports back to the master. It also reports back to master if there is an issue with pods. It exposes endpoint on :10255.

    • /spec endpoint – Provides the information about the node that runs on.
    • /healthz endpoint  – Its health check endpoint.
    • /pods endpoint – Provides the runnings pods information.


  • Container Engine – Container Run-time   

Pods package the container into it. To deploy a container, you need container runtime software. In most of the cases, it will be a docker engine. We could also use other container runtime software (ex: rkt). Container engine manages the containers that run on the pod. It will pull the images for deployment and start/stops containers on the pods.

  • Kube-proxy 

The kube-proxy is a network brain of the node. It ensures that each pod gets unique IP.  If you are packing multiple contain trainers in single pods,  all the container in a  pod shares a single IP. It also load-balances across all pods in a service.


How does it work? 

The following diagram shows how pods are created in the worker node. Kubectl is command line utility in which you can pass commands to the Kubernetes cluster to create and manage various Kubernetes component.


How K8s works
How K8s works


Hope this article is informative to you. Share it! Be Sociable!!

In the upcoming article, we will see another important component of Kubernetes – The Pod.

The post How Kubernetes works ? – Core Components and Architecture appeared first on UnixArena.

How to pass variable from one playbook to another playbook ? Ansible

$
0
0

In Ansible, passing a variable from one playbook to another playbook is not a straight forward. (If the target hosts are different). We might need to get the variable value from one host and use that value against another host in some cases. This article will provide a solution to overcome this kind of tricky situation in Ansible.

Here are the scenarios of passing a variable from one playbook to another playbook or register a variable to persist between plays in Ansible.

  • Two playbooks which target single host – In the same play
  • Two playbooks which target different hosts – In the same play


Environment: 

  • Ansible Engine: 2.7
Ansible - Sharing the variable between playbooks
Ansible – Sharing the variable between playbooks


Register a variable to persist between plays in Ansible – Same target host:

Here are the master playbook contents which includes other two playbooks.

[root@ansible-server ~]# cat global.yaml
---
# Combine multiple playbooks
  - import_playbook: test.play1.yaml
  - import_playbook: test.play2.yaml
[root@ansible-server ~]#


 Playbook contents: test.play1.yaml

In test.play1 playbook, we are registering new variable “PLAY1VAR”  to use it in the second playbook.

---
- hosts: localhost
  gather_facts: false

  tasks:
   - name: Register a new value
     shell: echo "/etc/resolv.conf"
     register: PLAY1VAR

   - debug: msg="{{PLAY1VAR.stdout}}"


Playbook contents: test.play2.yaml 

In test.play2 playbook, we are using “PLAY1VAR”  to view the last line of the file content and registering the result in PLAY2_RESULTS variable.

---
- hosts: localhost
  gather_facts: false

  tasks:
   - name: Echo the output - PLAY1 variable vaule
     shell: cat "{{PLAY1VAR.stdout}}" |tail -1
     register: PLAY2_RESULTS

   - debug: msg="{{PLAY2_RESULTS.stdout}}"


Test our work:

[root@ansible-server ~]# ansible-playbook -i localhost global.yaml
PLAY [localhost] *******************************************************************

TASK [Register a new value] *********************************************************
changed: [localhost]

TASK [debug] *************************************************************************
ok: [localhost] => {
    "msg": "/etc/resolv.conf"
}

PLAY [localhost] *********************************************************************

TASK [Echo the output - PLAY1 variable vaule] ***************************************************************************************
changed: [localhost]

TASK [debug] *************************************************************************
ok: [localhost] => {
    "msg": "nameserver 192.168.3.2"
}

PLAY RECAP ****************************************************************************
localhost                  : ok=4    changed=2    unreachable=0    failed=0

[root@ansible-server ~]# 


We have successfully passed the variable from one playbook to another playbook (It the target host is the same). We have got the desired results.


Register a variable to persist between plays in Ansible – Different Target Hosts

What will happen if the target hosts are different? I have modified the test.play2.yaml‘s target host and test.play1.yaml still points to localhost. Let me re-run the job to check the results.

[root@ansible-server ~]# ansible-playbook -i inventory_1 global.yaml

PLAY [localhost] **********************************************************************

TASK [Register a new value] ***********************************************************
changed: [127.0.0.1]

TASK [debug] ***************************************************************************
ok: [127.0.0.1] => {
    "msg": "/etc/resolv.conf"
}

PLAY [192.168.3.151] ******************************************************************
TASK [Echo the output - PLAY1 variable vaule] *****************************************
fatal: [192.168.3.151]: FAILED! => {"msg": "The task includes an option with an undefined 
variable. The error was: 'PLAY1VAR' is undefined\n\nThe error appears to have been in 
'/root/test.play2.yaml': line 6, column 6, but may\nbe elsewhere in the file depending 
on the exact syntax problem.\n\nThe offending line appears to be:\n\n  tasks:\n   
- name: Echo the output - PLAY1 variable vaule\n     ^ here\n"}

PLAY RECAP ****************************************************************************
127.0.0.1                  : ok=2    changed=1    unreachable=0    failed=0
192.168.3.151              : ok=0    changed=0    unreachable=0    failed=1
[root@ansible-server ~]#

The Ansible play failed due to an undefined variable (PLAY1VAR)in test.play2.yaml file. We have got the most common error – “The task includes an option with an undefined variable“. 


Soultion:

1. Make the changes on test.play1.yaml.Highlighted the changes.

---
- hosts: localhost
  gather_facts: false

  tasks:
   - name: Register a new value
     shell: echo "/etc/resolv.conf"
     register: PLAY1VAR

   - debug: msg="{{PLAY1VAR.stdout}}"

   - name:
     add_host:
       name: "DUMMY_HOST"
       PLAY1VAR_NEW: " {{ PLAY1VAR.stdout }}"


2. Make the change like below on test.play2.yaml. Highlighted the changes.

---
- hosts: 192.168.3.151
  gather_facts: false

  tasks:
   - name: Echo the output - PLAY1 variable vaule
     shell: cat {{ hostvars['DUMMY_HOST']['PLAY1VAR_NEW'] }} |tail -1
     register: PLAY2_RESULTS

   - debug: msg="{{PLAY2_RESULTS.stdout}}"


3. Re-run the playbook and check the results.

[root@ansible-server ~]# ansible-playbook -i inventory_1 global.yaml

PLAY [localhost] ************************************************************

TASK [Register a new value] *************************************************
changed: [127.0.0.1]

TASK [debug] ***************************************************************&
ok: [127.0.0.1] => {
    "msg": "/etc/resolv.conf"
}

TASK [add_host] *************************************************************
changed: [127.0.0.1]

PLAY [192.168.3.151] ********************************************************

TASK [Echo the output - PLAY1 variable vaule] ******************************************************************************
changed: [192.168.3.151]

TASK [debug] *****************************************************************
ok: [192.168.3.151] => {
    "msg": "nameserver 192.168.3.2"
}

PLAY RECAP ******************************************************************
127.0.0.1                  : ok=3    changed=2    unreachable=0    failed=0
192.168.3.151              : ok=2    changed=1    unreachable=0    failed=0

[root@ansible-server ~]#


We have successfully carried the registered variable from one playbook to another on different target hosts.


Hope this article is informative to you! Share it! Be Sociable !!!

The post How to pass variable from one playbook to another playbook ? Ansible appeared first on UnixArena.

Ansible – Reboot Server Using Playbook and Wait for come back

$
0
0

Ansible is a simple configuration management tool. Open source community keeps trying to make the code much simpler on the newer version.  Prior to Ansible engine 2.7, To reboot the target hosts, we need to define a block of code to reboot the server and wait until the hosts to come back. Most of the time. making the configuration changes or installing the OS patches which require a reboot. Post reboot, we might need to get few commands output to validate those changes. This article will walk through how Ansible 2.7 engine codes reduce the block of code.

Reboot and wait for host to come back - Ansible Playbook
Reboot and wait for host to come back – Ansible Playbook


Reboot the node/server and wait to come back :  (Prior to 2.7)

Here is the block of code that we use to reboot the target hosts and perform post checks.  (Highlighted the reboot block)

---
- hosts: all
  become: yes

  tasks:
   - name: Check the uptime prior reboot
     shell: uptime
     register: UPTIME_PRE_REBOOT

   - debug: msg={{UPTIME_PRE_REBOOT.stdout}}

   - name: Reboot node and stop polling.
     shell: reboot
     async: 10 # Do not care for 10 sec
     poll: 0 # Fire & Forget

   - name: wait for host to finish reb00t
     wait_for:
      port: "{{ (ansible_port|default(ansible_ssh_port))|default(22) }}"
      host: '{{ (ansible_ssh_host|default(ansible_host))|default(inventory_hostname) }}'
      search_regex: OpenSSH
      delay: 10  # Do not check for at least 10 sec
     connection: local

   - name: Check the uptime post reboot
     shell: uptime
     register: UPTIME_POST_REBOOT

   - debug: msg={{UPTIME_POST_REBOOT.stdout}}


Run the playbook and Check Results:  (Prior to 2.7)

[root@ansible-server ~]# ansible-playbook -i hosts_lists reboot_wait_to_come_back_2.6.yml -k
SSH password:

PLAY [all] *******************************************************************************

TASK [Gathering Facts] ********************************************************************
ok: [192.168.3.20]

TASK [Check the uptime prior reboot] ********************************************************************************************
changed: [192.168.3.20]

TASK [debug] *******************************************************************************
ok: [192.168.3.20] => {
    "msg": " 01:41:53 up 7 min,  2 users,  load average: 0.00, 0.04, 0.05"
}

TASK [Reboot node and stop polling.] ********************************************************************************************
changed: [192.168.3.20]

TASK [wait for host to finish reb00t] *******************************************************************************************
ok: [192.168.3.20]

TASK [Check the uptime post reboot] *******************************************************************************************
changed: [192.168.3.20]

TASK [debug] ******************************************************************************
ok: [192.168.3.20] => {
    "msg": " 01:42:33 up 0 min,  1 user,  load average: 0.62, 0.14, 0.05"
}

PLAY RECAP *******************************************************************************
192.168.3.20               : ok=7    changed=3    unreachable=0    failed=0

[root@ansible-server ~]#


In Ansible 2.7, reboot block of code looks very simple. Please see the below code to reboot the server and wait to come back.

---
- hosts: all
  become: yes

  tasks:
   - name: Check the uptime
     shell: uptime
     register: UPTIME_PRE_REBOOT

   - debug: msg={{UPTIME_PRE_REBOOT.stdout}}

   - name: Unconditionally reboot the machine with all defaults
     reboot:

   - name: Check the uptime after reboot
     shell: uptime
     register: UPTIME_POST_REBOOT

   - debug: msg={{UPTIME_POST_REBOOT.stdout}}


Let’s test the playbook.

[root@ansible-server ~]# ansible-playbook -i hosts_lists reboot_wait_to_come_back.yml -k
SSH password:

PLAY [all] ************************************************************************************

TASK [Gathering Facts] ***********************************************************************************************
ok: [192.168.3.20]

TASK [Check the uptime] *************************************************************************************************
changed: [192.168.3.20]

TASK [debug] ************************************************************************************
ok: [192.168.3.20] => {
    "msg": " 01:15:38 up 12 min,  2 users,  load average: 0.16, 0.06, 0.06"
}

TASK [Unconditionally reboot the machine with all defaults] *****************************************************************************************

changed: [192.168.3.20]

TASK [Check the uptime after reboot] *************************************************************************************************
changed: [192.168.3.20]

TASK [debug] *************************************************************************************
ok: [192.168.3.20] => {
    "msg": " 01:17:28 up 1 min,  2 users,  load average: 1.19, 0.57, 0.22"
}

PLAY RECAP **************************************************************************************
192.168.3.20               : ok=6    changed=3    unreachable=0    failed=0
[root@ansible-server ~]#

If the target nodes are very slow to reboot, you can increase the reboot timeout using additional option.

- name: Reboot a slow machine that might have lots of updates to apply
  reboot:
    reboot_timeout: 3600


Refer the ansible reboot module page to know more about additional parameters.  Hope this article is informative to you. Share the knowledge with your colleagues.

The post Ansible – Reboot Server Using Playbook and Wait for come back appeared first on UnixArena.

Kubernetes – Overview of Pod and Service

$
0
0

This article will give a high-level view of Kubernetes Pods and Services. Kubernetes runs containers but always inside the pods. You can’t directly deploy container without pods in Kubernetes. The shared context of the pod is a set of Linux namespaces, cgroups, and other facets of isolation. Docker container does the same but the application gets the further sub-isolation since pods host the container itself in it (Docker or rkt).  The pod can consist of one or more containers. But containers within the pod must share the same IP address and port. The Pod dictates the container that how to run and where to run within the k8s cluster.


In the VMware world, a virtual machine is an atomic unit and “container” in docker the world. In the Kubernetes world, Pods are the atomic units.

Vmware vpshere vs Docker vs Kubernetes
Docker vs vSphere vs Kubernetes


Pods are the highest level of the ring-fenced environment. In this environment, it creates the network stack, kernel namespace and etc.. All containers in a pod share the pod environment including kernel namespace, shared memory.

Kubernetes Pod's - Stack
Kubernetes Pod’s- Stack


Pod Lifecycle: 

Pod lifecycle is similar to human life.  Born! Live !! Die !!! There is no way to restart or reboot the pods. when a Pod dies, the brand new pod will be deployed by replication controller in the Kubernertes cluster.

Value Description
Pending The Pod has been accepted by the k8s cluster, but one or more of the container images are yet to be created. This includes time before being scheduled as well as time spent downloading images over the network, which could take a while.
Running The Pod has been bound to a node, and all of the Containers have been created. At least one Container is still running or is in the process of starting or restarting.
Succeeded All Containers in the Pod have terminated in success, and will not be restarted.
Failed All Containers in the Pod have terminated, and at least one Container has terminated in failure. That is, the Container either exited with non-zero status or was terminated by the system.
Unknown For some reason, the state of the Pod could not be obtained, typically due to an error in communicating with the host of the

Refer: https://kubernetes.io/docs/concepts/workloads/pods/pod-lifecycle/


If any of the running Pod dies, it will be re-deployed anywhere within the cluster using a new IP address. In the below example, Database pod on Node 2 has failed and brand new pod has been re-deployed in Node 5 with new Pod IP.

How Kubernetes Replace the failed Pod
How Kubernetes Re-deploy the failed Pod


Why did Service need in Kubernetes? 

In the below example, three application pods (front-end) communicates with the two backend database pods. If anyone of the backend database Pod dies/terminates, the brand new pod will be deployed with the new IP address with exact configuration of the terminated Pod.

Pods - Kubernetes -without Service
Pods – Kubernetes -without Service


  • When the Pod’s are re-deployed with the new IP address, the front-end application servers might not aware of the changes.
  • We might encounter the same issue when you scale-up or scale down the environment since Pod’s will be spin up with new IP’s.
  • All the existing Pod’s will be replaced with the newer one when you do the rolling updates.


How to overcome the above-mentioned limitations? Service !!!

Service creates the bridge between front-end and back-end pods in Kubernetes cluster. It also provides load balancing functionality to the pods. Service is a Kubernetes object and needs to be defined in the YAML manifest. Once the service object in place, it provides stable IP and DNS names to the backend pods.

Importance of Service in Kubernetes


In the above example, frontend pods are reaching the service object and load balances to the backend database pods with stable IP and DNS names. If one of thePod dies and get replaced with another, service updates and maintains the replaced pod IP details.

If you scale up the DB pods, service will update the newly created pod’s IP and it will spread the upcoming requests to the newly created pods to balance the load.  In the upcoming article, we will discuss Labels in Kubernetes.


Hope this article is informative to you. Share it! Be Sociable !!!

The post Kubernetes – Overview of Pod and Service appeared first on UnixArena.

How to pass variable from one playbook to another playbook ? Ansible

$
0
0

In Ansiblepassing a variable from one playbook to another playbook is not a straight forward. (If the target hosts are different). We might need to get the variable value from one host and use that value against another host in some cases. This article will provide a solution to overcome this kind of tricky situation in Ansible.

Here are the scenarios of passing a variable from one playbook to another playbook or register a variable to persist between plays in Ansible.

  • Two playbooks which target single host – In the same play
  • Two playbooks which target different hosts – In the same play


Environment

  • Ansible Engine: 2.7
Ansible – Sharing the variable between playbooks


Register a variable to persist between plays in Ansible – Same target host:

Here are the master playbook contents which includes other two playbooks.

[root@ansible-server ~]# cat global.yaml
---
# Combine multiple playbooks
  - import_playbook: test.play1.yaml
  - import_playbook: test.play2.yaml
[root@ansible-server ~]#


 Playbook contents: test.play1.yaml

In test.play1 playbook, we are registering new variable “PLAY1VAR”  to use it in the second playbook.

---
- hosts: localhost
  gather_facts: false

  tasks:
   - name: Register a new value
     shell: echo "/etc/resolv.conf"
     register: PLAY1VAR

   - debug: msg="{{PLAY1VAR.stdout}}"


Playbook contents: test.play2.yaml 

In test.play2 playbook, we are using “PLAY1VAR”  to view the last line of the file content and registering the result in PLAY2_RESULTS variable.

---
- hosts: localhost
  gather_facts: false

  tasks:
   - name: Echo the output - PLAY1 variable vaule
     shell: cat "{{PLAY1VAR.stdout}}" |tail -1
     register: PLAY2_RESULTS

   - debug: msg="{{PLAY2_RESULTS.stdout}}"


Test our work:

[root@ansible-server ~]# ansible-playbook -i localhost global.yaml
PLAY [localhost] *******************************************************************

TASK [Register a new value] *********************************************************
changed: [localhost]

TASK [debug] *************************************************************************
ok: [localhost] => {
    "msg": "/etc/resolv.conf"
}

PLAY [localhost] *********************************************************************

TASK [Echo the output - PLAY1 variable vaule] ***************************************************************************************
changed: [localhost]

TASK [debug] *************************************************************************
ok: [localhost] => {
    "msg": "nameserver 192.168.3.2"
}

PLAY RECAP ****************************************************************************
localhost                  : ok=4    changed=2    unreachable=0    failed=0

[root@ansible-server ~]# 


We have successfully passed the variable from one playbook to another playbook (It the target host is the same). We have got the desired results.


Register a variable to persist between plays in Ansible – Different Target Hosts

What will happen if the target hosts are different? I have modified the test.play2.yaml‘s target host and test.play1.yaml still points to localhost. Let me re-run the job to check the results.


[root@ansible-server ~]# ansible-playbook -i inventory_1 global.yaml

PLAY [localhost] **********************************************************************

TASK [Register a new value] ***********************************************************
changed: [127.0.0.1]

TASK [debug] ***************************************************************************
ok: [127.0.0.1] => {
    "msg": "/etc/resolv.conf"
}

PLAY [192.168.3.151] ******************************************************************
TASK [Echo the output - PLAY1 variable vaule] *****************************************
fatal: [192.168.3.151]: FAILED! => {"msg": "The task includes an option with an undefined 
variable. The error was: 'PLAY1VAR' is undefined\n\nThe error appears to have been in 
'/root/test.play2.yaml': line 6, column 6, but may\nbe elsewhere in the file depending 
on the exact syntax problem.\n\nThe offending line appears to be:\n\n  tasks:\n   
- name: Echo the output - PLAY1 variable vaule\n     ^ here\n"}

PLAY RECAP ****************************************************************************
127.0.0.1                  : ok=2    changed=1    unreachable=0    failed=0
192.168.3.151              : ok=0    changed=0    unreachable=0    failed=1
[root@ansible-server ~]#


The Ansible play failed due to an undefined variable (PLAY1VAR)in test.play2.yaml file. We have got the most common error – “The task includes an option with an undefined variable“.


Solution:

1. Make the changes on test.play1.yaml.Highlighted the changes.

---
- hosts: localhost
  gather_facts: false

  tasks:
   - name: Register a new value
     shell: echo "/etc/resolv.conf"
     register: PLAY1VAR

   - debug: msg="{{PLAY1VAR.stdout}}"

   - name:
     add_host:
       name: "DUMMY_HOST"
       PLAY1VAR_NEW: " {{ PLAY1VAR.stdout }}"


2. Make the change like below on test.play2.yaml. Highlighted the changes.

---
- hosts: 192.168.3.151
  gather_facts: false

  tasks:
   - name: Echo the output - PLAY1 variable vaule
     shell: cat {{ hostvars['DUMMY_HOST']['PLAY1VAR_NEW'] }} |tail -1
     register: PLAY2_RESULTS

   - debug: msg="{{PLAY2_RESULTS.stdout}}"


3. Re-run the playbook and check the results.

[root@ansible-server ~]# ansible-playbook -i inventory_1 global.yaml

PLAY [localhost] ************************************************************

TASK [Register a new value] *************************************************
changed: [127.0.0.1]

TASK [debug] ***************************************************************&
ok: [127.0.0.1] => {
    "msg": "/etc/resolv.conf"
}

TASK [add_host] *************************************************************
changed: [127.0.0.1]

PLAY [192.168.3.151] ********************************************************

TASK [Echo the output - PLAY1 variable vaule] ******************************************************************************
changed: [192.168.3.151]

TASK [debug] *****************************************************************
ok: [192.168.3.151] => {
    "msg": "nameserver 192.168.3.2"
}

PLAY RECAP ******************************************************************
127.0.0.1                  : ok=3    changed=2    unreachable=0    failed=0
192.168.3.151              : ok=2    changed=1    unreachable=0    failed=0

[root@ansible-server ~]#


We have successfully carried the registered variable from one playbook to another on different target hosts.


Hope this article is informative to you! Share it! Be Sociable !!!

The post How to pass variable from one playbook to another playbook ? Ansible appeared first on UnixArena.


Ansible – Reboot Server Using Playbook and Wait for come back

$
0
0

Ansible is a simple configuration management tool. Open source community keeps trying to make the code much simpler on the newer version.  Prior to Ansible engine 2.7, To reboot the target hosts, we need to define a block of code to reboot the server and wait until the hosts to come back. Most of the time. making the configuration changes or installing the OS patches which require a reboot. Post reboot, we might need to get few commands output to validate those changes. This article will walk through how Ansible 2.7 engine codes reduce the block of code.


Reboot host and wait for host to come back - Ansible
Reboot the host and wait for the host to come back – Ansible


Reboot the node/server and wait to come back :  (Prior to 2.7)

Here is the block of code that we use to reboot the target hosts and perform post checks.  (Highlighted the reboot block)

---
- hosts: all
  become: yes

  tasks:
   - name: Check the uptime prior reboot
     shell: uptime
     register: UPTIME_PRE_REBOOT

   - debug: msg={{UPTIME_PRE_REBOOT.stdout}}

   - name: Reboot node and stop polling.
     shell: reboot
     async: 10 # Do not care for 10 sec
     poll: 0 # Fire & Forget

   - name: wait for host to finish reb00t
     wait_for:
      port: "{{ (ansible_port|default(ansible_ssh_port))|default(22) }}"
      host: '{{ (ansible_ssh_host|default(ansible_host))|default(inventory_hostname) }}'
      search_regex: OpenSSH
      delay: 10  # Do not check for at least 10 sec
     connection: local

   - name: Check the uptime post reboot
     shell: uptime
     register: UPTIME_POST_REBOOT

   - debug: msg={{UPTIME_POST_REBOOT.stdout}}


Run the playbook and Check Results:  (Prior to 2.7)

[root@ansible-server ~]# ansible-playbook -i hosts_lists reboot_wait_to_come_back_2.6.yml -k
SSH password:

PLAY [all] *******************************************************************************

TASK [Gathering Facts] ********************************************************************
ok: [192.168.3.20]

TASK [Check the uptime prior reboot] ********************************************************************************************
changed: [192.168.3.20]

TASK [debug] *******************************************************************************
ok: [192.168.3.20] => {
    "msg": " 01:41:53 up 7 min,  2 users,  load average: 0.00, 0.04, 0.05"
}

TASK [Reboot node and stop polling.] ********************************************************************************************
changed: [192.168.3.20]

TASK [wait for host to finish reb00t] *******************************************************************************************
ok: [192.168.3.20]

TASK [Check the uptime post reboot] *******************************************************************************************
changed: [192.168.3.20]

TASK [debug] ******************************************************************************
ok: [192.168.3.20] => {
    "msg": " 01:42:33 up 0 min,  1 user,  load average: 0.62, 0.14, 0.05"
}

PLAY RECAP *******************************************************************************
192.168.3.20               : ok=7    changed=3    unreachable=0    failed=0

[root@ansible-server ~]#


Reboot block in Ansible 2.7 :

In Ansible 2.7, reboot block of code looks very simple. Please see the below code to reboot the server and wait to come back.

---
- hosts: all
  become: yes

  tasks:
   - name: Check the uptime
     shell: uptime
     register: UPTIME_PRE_REBOOT

   - debug: msg={{UPTIME_PRE_REBOOT.stdout}}

   - name: Unconditionally reboot the machine with all defaults
     reboot:

   - name: Check the uptime after reboot
     shell: uptime
     register: UPTIME_POST_REBOOT

   - debug: msg={{UPTIME_POST_REBOOT.stdout}}


Let’s test the playbook.

[root@ansible-server ~]# ansible-playbook -i hosts_lists reboot_wait_to_come_back.yml -k
SSH password:

PLAY [all] ************************************************************************************

TASK [Gathering Facts] ***********************************************************************************************
ok: [192.168.3.20]

TASK [Check the uptime] *************************************************************************************************
changed: [192.168.3.20]

TASK [debug] ************************************************************************************
ok: [192.168.3.20] => {
    "msg": " 01:15:38 up 12 min,  2 users,  load average: 0.16, 0.06, 0.06"
}

TASK [Unconditionally reboot the machine with all defaults] *****************************************************************************************

changed: [192.168.3.20]

TASK [Check the uptime after reboot] *************************************************************************************************
changed: [192.168.3.20]

TASK [debug] *************************************************************************************
ok: [192.168.3.20] => {
    "msg": " 01:17:28 up 1 min,  2 users,  load average: 1.19, 0.57, 0.22"
}

PLAY RECAP **************************************************************************************
192.168.3.20               : ok=6    changed=3    unreachable=0    failed=0
[root@ansible-server ~]#

If the target nodes are very slow to reboot, you can increase the reboot timeout using additional option.

- name: Reboot a slow machine that might have lots of updates to apply
  reboot:
    reboot_timeout: 3600


Refer the ansible reboot module page to know more about additional parameters.  Hope this article is informative to you. Share the knowledge with your colleagues.

The post Ansible – Reboot Server Using Playbook and Wait for come back appeared first on UnixArena.

Kubernetes – Overview of Pod and Service

$
0
0

This article will give a high-level view of Kubernetes Pods and Services. Kubernetes runs containers but always inside the pods. You can’t directly deploy container without pods in Kubernetes. The shared context of the pod is a set of Linux namespaces, cgroups, and other facets of isolation. Docker container does the same but the application gets the further sub-isolation since pods host the container itself in it (Docker or rkt).  The pod can consist of one or more containers. But containers within the pod must share the same IP address and port. The Pod dictates the container that how to run and where to run within the k8s cluster.


In the VMware world, a virtual machine is an atomic unit and “container” in docker the world. In the Kubernetes world, Pods are the atomic units.

Docker vs vSphere vs Kubernetes


Pods are the highest level of the ring-fenced environment. In this environment, it creates the network stack, kernel namespace and etc.. All containers in a pod share the pod environment including kernel namespace, shared memory.

Kubernetes Pod's stack
Kubernetes Pod’s stack


Pod Lifecycle:

Pod lifecycle is similar to human life.  BornLive !! Die !!! There is no way to restart or reboot the pods. when a Pod dies, the brand new pod will be deployed by replication controller in the Kubernertes cluster.

Value Description
Pending The Pod has been accepted by the k8s cluster, but one or more of the container images are yet to be created. This includes time before being scheduled as well as time spent downloading images over the network, which could take a while.
Running The Pod has been bound to a node, and all of the Containers have been created. At least one Container is still running or is in the process of starting or restarting.
Succeeded All Containers in the Pod have terminated in success, and will not be restarted.
Failed All Containers in the Pod have terminated, and at least one Container has terminated in failure. That is, the Container either exited with non-zero status or was terminated by the system.
Unknown For some reason, the state of the Pod could not be obtained, typically due to an error in communicating with the host of the

Refer: https://kubernetes.io/docs/concepts/workloads/pods/pod-lifecycle/


If any of the running Pod dies, it will be re-deployed anywhere within the cluster using a new IP address. In the below example, Database pod on Node 2 has failed and brand new pod has been re-deployed in Node 5 with new Pod IP.

How Kubernetes Re-deploy the failed Pod
How Kubernetes Replace the failed Pod with new one


Why did Service need in Kubernetes

In the below example, three application pods (front-end) communicates with the two backend database pods. If anyone of the backend database Pod dies/terminates, the brand new pod will be deployed with the new IP address with exact configuration of the terminated Pod.


Pods – Kubernetes -without Service


  • When the Pod’s are re-deployed with the new IP address, the front-end application servers might not aware of the changes.
  • We might encounter the same issue when you scale-up or scale down the environment since Pod’s will be spin up with new IP’s.
  • All the existing Pod’s will be replaced with the newer one when you do the rolling updates.


How to overcome the above-mentioned limitations? Service !!!

Service creates the bridge between front-end and back-end pods in Kubernetes cluster. It also provides load balancing functionality to the pods. Service is a Kubernetes object and needs to be defined in the YAML manifest. Once the service object in place, it provides stable IP and DNS names to the backend pods.


Importance of Service in Kubernetes


In the above example, frontend pods are reaching the service object and load balances to the backend database pods with stable IP and DNS names. If one of thePod dies and get replaced with another, service updates and maintains the replaced pod IP details.

If you scale up the DB pods, service will update the newly created pod’s IP and it will spread the upcoming requests to the newly created pods to balance the load.  In the upcoming article, we will discuss Labels in Kubernetes.


Hope this article is informative to you. Share it! Be Sociable !!!

The post Kubernetes – Overview of Pod and Service appeared first on UnixArena.

RHEL 7 / Cent OS 7 –“fwupdate-efi” conflicts with “grub2-common”

$
0
0

Have you got the package conflict error while installing the specific package on RHEL 7 /CentOS 7? Frequently, “fwupdate-efi” package conflicts with the “grub2-common” package in RHEL 7 / CentOS 7 environment. This article will provide the step by step procedure to resolve package conflict errors. In general, if you get such error, you must update the system and retry before taking any action. I have encountered the following error while installing GUI packages (#yum groupinstall “Server with GUI”).


Transaction check error:

Transaction check error:
file /boot/efi/EFI/centos from install of fwupdate-efi-12-5.el7.centos.x86_64 conflicts with file from package grub2-common-1:2.02-0.65 .el7.centos.2.noarch

Error Summary
————-


Solution:

1.  Try to update “grub2” & “firewalld” packages.

[root@kubebase centos]# yum upgrade grub2 firewalld
Loaded plugins: fastestmirror
Loading mirror speeds from cached hostfile
 * base: mirrors.viethosting.com
 * extras: mirrors.viethosting.com
 * updates: mirrors.viethosting.com
Resolving Dependencies
--> Running transaction check
---> Package firewalld.noarch 0:0.4.4.4-14.el7 will be updated
---> Package firewalld.noarch 0:0.5.3-5.el7 will be an update
--> Processing Dependency: python-firewall = 0.5.3-5.el7 for package: firewalld-0.5.3-5.el7.noarch
--> Processing Dependency: firewalld-filesystem = 0.5.3-5.el7 for package: firewalld-0.5.3-5.el7.noarch
---> Package grub2.x86_64 1:2.02-0.65.el7.centos.2 will be updated
---> Package grub2.x86_64 1:2.02-0.65.el7.centos.2 will be obsoleted
---> Package grub2.x86_64 1:2.02-0.76.el7.centos.1 will be obsoleting
--> Processing Dependency: grub2-pc = 1:2.02-0.76.el7.centos.1 for package: 1:grub2-2.02-0.76.el7.centos.1.x86_64 

2. Install GUI packages using the following command which had thrown transaction error before.

[root@kubebase centos]# yum groupinstall "Server with GUI"

or 

[root@kubebase centos]# yum groupinstall 'X Window System' 'GNOME'
Loaded plugins: fastestmirror
There is no installed groups file.
Maybe run: yum groups mark convert (see man yum)
Loading mirror speeds from cached hostfile
 * base: mirrors.viethosting.com
 * extras: mirrors.viethosting.com
 * updates: mirrors.viethosting.com
Resolving Dependencies
--> Running transaction check

You could apply the same logic for any of the conflict errors in YUM. Upgrade the installed package and try to install new packages to overcome this issue.


3. If the above-mentioned method didn’t work, try to update the complete system using yum update and try again.

Hope this article helpful to you.

The post RHEL 7 / Cent OS 7 – “fwupdate-efi” conflicts with “grub2-common” appeared first on UnixArena.

How to Deploy Kubernetes ? Minikube on RHEL/CentOS

$
0
0

How to create a Kubernetes’s sandbox environment?.  How to experience Kubernetes in Laptop/Desktop? MiniQube is developed for desktop/Laptop environment to experience the Kubernetes cluster.  “Minikube” runs a single-node Kubernetes cluster inside the Virtual Machine on Laptop/Desktop with help of virtualization technology (Virtual Box, KVM, VMware Fusion). This article will walk through the deployment of  Minikube on RHEL 7 / CentOS 7 using KVM virtualization.


Note: Virtualization (VT) required only to create the VM for MiniKube.  (Not mandatory for actual Kubernetes deployment)


Envirnonemt:

  • Redhat Enterprise Linux 7 / CentOS 7
  • MiniKube
  • Access to Base & Extra CentOS/Redhat Repository


Installing & Configuring KVM (Virtualization Technology)

1.  Login to RHEL 7/CentOS 7 and install KVM packages.

[root@kubebase ~]# yum -y install qemu-kvm libvirt libvirt-daemon-kvm
Loaded plugins: fastestmirror
Determining fastest mirrors
 * base: mirrors.viethosting.com
 * extras: mirrors.viethosting.com
 * updates: mirrors.viethosting.com
base                                                                                                                                             | 3.6 kB  00:00:00
extras                                                                                                                                           | 3.4 kB  00:00:02
updates                                                                                                                                          | 3.4 kB  00:00:00
(1/4): base/7/x86_64/primary_db                             | 6.0 MB  00:00:03
(2/4): base/7/x86_64/group_gz                               | 166 kB  00:00:16
(3/4): extras/7/x86_64/primary_db                           | 201 kB  00:00:17
(4/4): updates/7/x86_64/primary_db                          | 5.0 MB  00:01:33
Resolving Dependencies


2. Start KVM services and enable to make it persistent across reboot.

[root@kubebase ~]#  systemctl start libvirtd
[root@kubebase ~]# systemctl enable libvirtd


3. Ensure that Laptop/Desktop is supporting the VT technology.

[root@kubebase ~]# virt-host-validate
  QEMU: Checking for hardware virtualization                                 : PASS
  QEMU: Checking if device /dev/kvm exists                                   : PASS
  QEMU: Checking if device /dev/kvm is accessible                            : PASS
  QEMU: Checking if device /dev/vhost-net exists                             : PASS
  QEMU: Checking if device /dev/net/tun exists                               : PASS
  QEMU: Checking for cgroup 'memory' controller support                      : PASS
  QEMU: Checking for cgroup 'memory' controller mount-point                  : PASS
  QEMU: Checking for cgroup 'cpu' controller support                         : PASS
  QEMU: Checking for cgroup 'cpu' controller mount-point                     : PASS
  QEMU: Checking for cgroup 'cpuacct' controller support                     : PASS
  QEMU: Checking for cgroup 'cpuacct' controller mount-point                 : PASS
  QEMU: Checking for cgroup 'cpuset' controller support                      : PASS
  QEMU: Checking for cgroup 'cpuset' controller mount-point                  : PASS
  QEMU: Checking for cgroup 'devices' controller support                     : PASS
  QEMU: Checking for cgroup 'devices' controller mount-point                 : PASS
  QEMU: Checking for cgroup 'blkio' controller support                       : PASS
  QEMU: Checking for cgroup 'blkio' controller mount-point                   : PASS
  QEMU: Checking for device assignment IOMMU support                         : WARN (No ACPI DMAR table found, IOMMU either disabled in BIOS or not supported by this hardware platform)
   LXC: Checking for Linux >= 2.6.26                                         : PASS
   LXC: Checking for namespace ipc                                           : PASS
   LXC: Checking for namespace mnt                                           : PASS
   LXC: Checking for namespace pid                                           : PASS
   LXC: Checking for namespace uts                                           : PASS
   LXC: Checking for namespace net                                           : PASS
   LXC: Checking for namespace user                                          : PASS
   LXC: Checking for cgroup 'memory' controller support                      : PASS
   LXC: Checking for cgroup 'memory' controller mount-point                  : PASS
   LXC: Checking for cgroup 'cpu' controller support                         : PASS
   LXC: Checking for cgroup 'cpu' controller mount-point                     : PASS
   LXC: Checking for cgroup 'cpuacct' controller support                     : PASS
   LXC: Checking for cgroup 'cpuacct' controller mount-point                 : PASS
   LXC: Checking for cgroup 'cpuset' controller support                      : PASS
   LXC: Checking for cgroup 'cpuset' controller mount-point                  : PASS
   LXC: Checking for cgroup 'devices' controller support                     : PASS
   LXC: Checking for cgroup 'devices' controller mount-point                 : PASS
   LXC: Checking for cgroup 'blkio' controller support                       : PASS
   LXC: Checking for cgroup 'blkio' controller mount-point                   : PASS


Ensure “firewalld” service is up and running.

[root@kubebase ~]# systemctl status firewalld
● firewalld.service - firewalld - dynamic firewall daemon
   Loaded: loaded (/usr/lib/systemd/system/firewalld.service; enabled; vendor preset: enabled)
   Active: active (running) since Tue 2019-05-21 14:36:01 EDT; 4min 10s ago
     Docs: man:firewalld(1)
 Main PID: 740 (firewalld)
   CGroup: /system.slice/firewalld.service
           └─740 /usr/bin/python -Es /usr/sbin/firewalld --nofork --nopid

May 21 14:35:58 kubebase systemd[1]: Starting firewalld - dynamic firewall daemon...
May 21 14:36:01 kubebase systemd[1]: Started firewalld - dynamic firewall daemon.
[root@kubebase ~]#

You might get the following error if you don’t enable firewalld.

12575 start.go:529] StartHost: create: Error creating machine: Error in driver during machine creation: creating network: creating network minikube-net: virError(Code=89, Domain=47, Message=’The name org.fedoraproject.FirewallD1 was not provided by any .service files’)

X Unable to start VM: create: Error creating machine: Error in driver during machine creation: creating network: creating network minikube-net: virError(Code=89, Domain=47, Message=’The name org.fedoraproject.FirewallD1 was not provided by any .service files’)

* Sorry that minikube crashed. If this was unexpected, we would love to hear from you:
– https://github.com/kubernetes/minikube/issues/new


Configure Kubernetes Repo:

4. Configure Kubernetes repo to install Kubernetes components.

[root@kubebase yum.repos.d]# cd /etc/yum.repos.d
[root@kubebase yum.repos.d]# cat Kubernetes.repo
[kubernetes]
name=Kubernetes
baseurl=https://packages.cloud.google.com/yum/repos/kubernetes-el7-$basearch
enabled=1
gpgcheck=1
repo_gpgcheck=1
gpgkey=https://packages.cloud.google.com/yum/doc/yum-key.gpg https://packages.cloud.google.com/yum/doc/rpm-package-key.gpg
[root@kubebase yum.repos.d]# pwd
/etc/yum.repos.d
[root@kubebase yum.repos.d]#


5. Install “kubectl” binary.

[root@kubebase yum.repos.d]# yum -y install kubectl
Loaded plugins: fastestmirror
Loading mirror speeds from cached hostfile
 * base: mirrors.viethosting.com
 * extras: mirrors.viethosting.com
 * updates: mirrors.viethosting.com
kubernetes/x86_64/signature                                                                                                                      |  454 B  00:00:00
Retrieving key from https://packages.cloud.google.com/yum/doc/yum-key.gpg
Importing GPG key 0xA7317B0F:
 Userid     : "Google Cloud Packages Automatic Signing Key <gc-team@google.com>"
 Fingerprint: d0bc 747f d8ca f711 7500 d6fa 3746 c208 a731 7b0f
 From       : https://packages.cloud.google.com/yum/doc/yum-key.gpg
Retrieving key from https://packages.cloud.google.com/yum/doc/rpm-package-key.gpg
kubernetes/x86_64/signature                                                                                                                      | 1.4 kB  00:00:00 !!!
kubernetes/x86_64/primary                                                                                                                        |  49 kB  00:00:02
kubernetes                                                                                                                                                      351/351
Resolving Dependencies
--> Running transaction check

<<<<<< Output Truncated >>>>>

Running transaction
  Installing : kubectl-1.14.2-0.x86_64                                                                                                                              1/1
  Verifying  : kubectl-1.14.2-0.x86_64                                                                                                                              1/1

Installed:
  kubectl.x86_64 0:1.14.2-0
Complete!


6.  Download the following components from Google repository.

  • docker-machine-driver-kvm2
  • minikube-linux-amd64 (minikube)
[root@kubebase ~]# wget https://storage.googleapis.com/minikube/releases/latest/minikube-linux-amd64 -O minikube
--2019-05-21 15:10:12--  https://storage.googleapis.com/minikube/releases/latest/minikube-linux-amd64
Resolving storage.googleapis.com (storage.googleapis.com)... 173.194.73.128, 2a00:1450:4010:c05::80
Connecting to storage.googleapis.com (storage.googleapis.com)|173.194.73.128|:443... connected.
HTTP request sent, awaiting response... 200 OK
Length: 41728440 (40M) [application/octet-stream]
Saving to: ‘minikube’

100%[=======================================================>] 41,728,440  1.11MB/s   in 37s

2019-05-21 15:10:54 (1.08 MB/s) - ‘minikube’ saved [41728440/41728440]

[root@kubebase ~]# wget https://storage.googleapis.com/minikube/releases/latest/docker-machine-driver-kvm2
--2019-05-21 15:11:14--  https://storage.googleapis.com/minikube/releases/latest/docker-machine-driver-kvm2
Resolving storage.googleapis.com (storage.googleapis.com)... 64.233.161.128, 2a00:1450:4010:c0e::80
Connecting to storage.googleapis.com (storage.googleapis.com)|64.233.161.128|:443... connected.
HTTP request sent, awaiting response... 200 OK
Length: 37581096 (36M) [application/octet-stream]
Saving to: ‘docker-machine-driver-kvm2’

100%[========================================================>] 37,581,096  1.18MB/s   in 39s

2019-05-21 15:11:59 (952 KB/s) - ‘docker-machine-driver-kvm2’ saved [37581096/37581096]

[root@kubebase ~]#


7. Modify the file permission and move the binary to the command search path.

[root@kubebase ~]# chmod 755 minikube docker-machine-driver-kvm2
[root@kubebase ~]# mv minikube docker-machine-driver-kvm2 /usr/local/bin/
[root@kubebase ~]#


8. Check the “minikube” version.

[root@kubebase ~]# minikube version
minikube version: v1.1.0
[root@kubebase ~]# kubectl version -o json
{
  "clientVersion": {
    "major": "1",
    "minor": "14",
    "gitVersion": "v1.14.2",
    "gitCommit": "66049e3b21efe110454d67df4fa62b08ea79a19b",
    "gitTreeState": "clean",
    "buildDate": "2019-05-16T16:23:09Z",
    "goVersion": "go1.12.5",
    "compiler": "gc",
    "platform": "linux/amd64"
  }
}


Deploying Minikube Cluster:

8. Start the minikube using KVM driver.

[root@kubebase ~]# minikube start --vm-driver kvm2
* minikube v1.1.0 on linux (amd64)
* Tip: Use 'minikube start -p ' to create a new cluster, or 'minikube delete' to delete this one.
* Restarting existing kvm2 VM for "minikube" ...
* Waiting for SSH access ...
* Configuring environment for Kubernetes v1.14.2 on Docker 18.09.6
* Relaunching Kubernetes v1.14.2 using kubeadm ...
* Verifying: apiserver proxy etcd scheduler controller dns
* Done! kubectl is now configured to use "minikube"
[root@kubebase ~]# 


If  you get the following error, just delete the “minikube” VM and re-create it

Tip: Use ‘minikube start -p ‘ to create a new cluster, or ‘minikube delete’ to delete this one.
E0522 03:48:03.458345 1488 start.go:529] StartHost: Error getting state for host: getting connection: looking up domain: virError(Code=0, Domain=0, Message=’Missing error’)

X Unable to start VM: Error getting state for host: getting connection: looking up domain: virError(Code=0, Domain=0, Message=’Missing error’)

* Sorry that minikube crashed. If this was unexpected, we would love to hear from you:
– https://github.com/kubernetes/minikube/issues/new


Delete the “minikube” VM using the following command.

[root@kubebase ~]# minikube delete
* Deleting "minikube" from kvm2 ...
* The "minikube" cluster has been deleted.
[root@kubebase ~]# minikube start --vm-driver kvm2
* minikube v1.1.0 on linux (amd64)
* Creating kvm2 VM (CPUs=2, Memory=2048MB, Disk=20000MB) ...
* Configuring environment for Kubernetes v1.14.2 on Docker 18.09.6

* Downloading kubeadm v1.14.2
* Downloading kubelet v1.14.2

X Failed to get driver URL: connection is shut down

* Sorry that minikube crashed. If this was unexpected, we would love to hear from you:
  - https://github.com/kubernetes/minikube/issues/new
[root@kubebase ~]#


Validating Minikube Health status:

9. Check the Kubernetes cluster status and ensure all the components are running

[root@kubebase ~]# minikube status
host: Running
kubelet: Running
apiserver: Running
kubectl: Correctly Configured: pointing to minikube-vm at 192.168.39.250


10. Checking the minikube service list. Dashboard namespace is missing here.

[root@kubebase ~]# minikube service list
|-------------|------------|--------------|
|  NAMESPACE  |    NAME    |     URL      |
|-------------|------------|--------------|
| default     | kubernetes | No node port |
| kube-system | kube-dns   | No node port |
|-------------|------------|--------------|


11. Checking the “Minikube” docker environment.

[root@kubebase ~]# minikube docker-env
export DOCKER_TLS_VERIFY="1"
export DOCKER_HOST="tcp://192.168.39.250:2376"
export DOCKER_CERT_PATH="/root/.minikube/certs"
export DOCKER_API_VERSION="1.39"
# Run this command to configure your shell:
# eval $(minikube docker-env)


12. Checking the Kubernetes cluster info.

[root@kubebase ~]# kubectl cluster-info
Kubernetes master is running at https://192.168.39.250:8443
KubeDNS is running at https://192.168.39.250:8443/api/v1/namespaces/kube-system/services/kube-dns:dns/proxy

To further debug and diagnose cluster problems, use 'kubectl cluster-info dump'.


13. Get the Kubernetes node status.

[root@kubebase ~]# kubectl get nodes
NAME       STATUS   ROLES    AGE     VERSION
minikube   Ready       2m33s   v1.14.2
[root@kubebase ~]# virsh list
 Id    Name                           State
----------------------------------------------------
 1     minikube                       running
[root@kubebase ~]#


14. How to access the “Minikube” VM and how to check the running containers for K8s? Execute “minikube ssh

[root@kubebase ~]# minikube ssh
                         _             _
            _         _ ( )           ( )
  ___ ___  (_)  ___  (_)| |/')  _   _ | |_      __
/' _ ` _ `\| |/' _ `\| || , <  ( ) ( )| '_`\  /'__`\
| ( ) ( ) || || ( ) || || |\`\ | (_) || |_) )(  ___/
(_) (_) (_)(_)(_) (_)(_)(_) (_)`\___/'(_,__/'`\____)

$ hostname
minikube
$ docker ps
CONTAINER ID        IMAGE                  COMMAND                  CREATED             STATUS              PORTS               NAMES
ad8a971620ca        eb516548c180           "/coredns -conf /etc…"   2 minutes ago       Up 2 minutes                            k8s_coredns_coredns-fb8b8dccf-8nr2q_kube-system_754dcbdd-7c6a-11e9-ac49-3c4a73c3bd3b_1
33f143a9716e        eb516548c180           "/coredns -conf /etc…"   2 minutes ago       Up 2 minutes                            k8s_coredns_coredns-fb8b8dccf-5szrq_kube-system_7552ebd8-7c6a-11e9-ac49-3c4a73c3bd3b_1
24fb3d16c349        4689081edb10           "/storage-provisioner"   3 minutes ago       Up 3 minutes                            k8s_storage-provisioner_storage-provisioner_kube-system_77744985-7c6a-11e9-ac49-3c4a73c3bd3b_0
a6e71c8b6a48        k8s.gcr.io/pause:3.1   "/pause"                 3 minutes ago       Up 3 minutes                            k8s_POD_storage-provisioner_kube-system_77744985-7c6a-11e9-ac49-3c4a73c3bd3b_0
8eab3bbc36dc        5c24210246bb           "/usr/local/bin/kube…"   3 minutes ago       Up 3 minutes                            k8s_kube-proxy_kube-proxy-h7xtp_kube-system_754e770e-7c6a-11e9-ac49-3c4a73c3bd3b_0
6dfc217ab40e        k8s.gcr.io/pause:3.1   "/pause"                 3 minutes ago       Up 3 minutes                            k8s_POD_coredns-fb8b8dccf-5szrq_kube-system_7552ebd8-7c6a-11e9-ac49-3c4a73c3bd3b_0
b74e2bf106ea        k8s.gcr.io/pause:3.1   "/pause"                 3 minutes ago       Up 3 minutes                            k8s_POD_kube-proxy-h7xtp_kube-system_754e770e-7c6a-11e9-ac49-3c4a73c3bd3b_0
65abe116b7fc        k8s.gcr.io/pause:3.1   "/pause"                 3 minutes ago       Up 3 minutes                            k8s_POD_coredns-fb8b8dccf-8nr2q_kube-system_754dcbdd-7c6a-11e9-ac49-3c4a73c3bd3b_0
48f7a41de231        5eeff402b659           "kube-apiserver --ad…"   3 minutes ago       Up 3 minutes                            k8s_kube-apiserver_kube-apiserver-minikube_kube-system_f0c7fec2368e56b97aab5eecfcc129ce_0
d6f51369e061        2c4adeb21b4f           "etcd --advertise-cl…"   3 minutes ago       Up 3 minutes                            k8s_etcd_etcd-minikube_kube-system_949db6759563e191943a9567caecc738_0
1f6ba3ce6775        119701e77cbc           "/opt/kube-addons.sh"    3 minutes ago       Up 3 minutes                            k8s_kube-addon-manager_kube-addon-manager-minikube_kube-system_0abcb7a1f0c9c0ebc9ec348ffdfb220c_0
4f7e30421a8b        8be94bdae139           "kube-controller-man…"   3 minutes ago       Up 3 minutes                            k8s_kube-controller-manager_kube-controller-manager-minikube_kube-system_9c1e365bd18b5d3fc6a5d0ff10c2b125_0
f2ebfba2662f        ee18f350636d           "kube-scheduler --bi…"   3 minutes ago       Up 3 minutes                            k8s_kube-scheduler_kube-scheduler-minikube_kube-system_9b290132363a92652555896288ca3f88_0
e250137f88af        k8s.gcr.io/pause:3.1   "/pause"                 3 minutes ago       Up 3 minutes                            k8s_POD_kube-apiserver-minikube_kube-system_f0c7fec2368e56b97aab5eecfcc129ce_0
a65431299b17        k8s.gcr.io/pause:3.1   "/pause"                 3 minutes ago       Up 3 minutes                            k8s_POD_etcd-minikube_kube-system_949db6759563e191943a9567caecc738_0
c6534ed33926        k8s.gcr.io/pause:3.1   "/pause"                 3 minutes ago       Up 3 minutes                            k8s_POD_kube-scheduler-minikube_kube-system_9b290132363a92652555896288ca3f88_0
d719dee6a5ea        k8s.gcr.io/pause:3.1   "/pause"                 3 minutes ago       Up 3 minutes                            k8s_POD_kube-addon-manager-minikube_kube-system_0abcb7a1f0c9c0ebc9ec348ffdfb220c_0
590ab88ce56d        k8s.gcr.io/pause:3.1   "/pause"                 3 minutes ago       Up 3 minutes                            k8s_POD_kube-controller-manager-minikube_kube-system_9c1e365bd18b5d3fc6a5d0ff10c2b125_0
$ 


15. To check the Kubeneters components version, execute the following command.

[root@kubebase ~]# kubectl version -o json
{
  "clientVersion": {
    "major": "1",
    "minor": "14",
    "gitVersion": "v1.14.2",
    "gitCommit": "66049e3b21efe110454d67df4fa62b08ea79a19b",
    "gitTreeState": "clean",
    "buildDate": "2019-05-16T16:23:09Z",
    "goVersion": "go1.12.5",
    "compiler": "gc",
    "platform": "linux/amd64"
  },
  "serverVersion": {
    "major": "1",
    "minor": "14",
    "gitVersion": "v1.14.2",
    "gitCommit": "66049e3b21efe110454d67df4fa62b08ea79a19b",
    "gitTreeState": "clean",
    "buildDate": "2019-05-16T16:14:56Z",
    "goVersion": "go1.12.5",
    "compiler": "gc",
    "platform": "linux/amd64"
  }
}
[root@kubebase ~]#

You could also list the “minikube” VM using the virsh command.

[root@kubebase yum.repos.d]# virsh list --all
 Id    Name                           State
----------------------------------------------------
 2     minikube                       running

[root@kubebase yum.repos.d]#

We have successfully deployed “Minikube” on RHEL 7/CentOS 7. Kubernetes dashboard namespace is missing in the service list. In the next article, we will deploy the dashboard and access it.

Share it! Comment it!! Be Sociable!!!

The post How to Deploy Kubernetes ? Minikube on RHEL/CentOS appeared first on UnixArena.

Kubernetes /Minikube – Enable Dashboard – RHEL 7 / CentOS 7

$
0
0

Are you missing Kubenertes Dashboard on Minikube deployment? This article will walk through how to enable the dashboard on Minikube deployment on localhost and remote client. The dashboard is a web-based user interface for Kubernetes. Web-UI is useful to deploy containerized applications in Kubernetes cluster and manage the cluster resources. It could also help to scale deployment, rolling update, restart a pod using a wizard.

Environment:


Here is the list of actions which I took to bring the dashboard on localhost and remote node.

Enable the dashboard on Localhost – Minikube

1. Execute the following command to deploy the dashboard in Minikube. I am using mobaxterm to get X11 forwarding enabled to open the browser.

login as: root
     ┌────────────────────────────────────────────────────────────────────┐
     │                        • MobaXterm 10.5 •                          │
     │            (SSH client, X-server and networking tools)             │
     │                                                                    │
     │ ➤ SSH session to root@192.168.3.165                                │
     │   • SSH compression : ✔                                            │
     │   • SSH-browser     : ✔                                            │
     │   • X11-forwarding  : ✔  (remote display is forwarded through SSH) │
     │   • DISPLAY         : ✔  (automatically set on remote server)      │
     │                                                                    │
     │ ➤ For more info, ctrl+click on help or visit our website           │
     └────────────────────────────────────────────────────────────────────┘

Last login: Wed May 22 07:52:09 2019 from 192.168.3.1
[root@kubebase ~]# minikube dashboard
* Enabling dashboard ...
* Verifying dashboard health ...
* Launching proxy ...
* Verifying proxy health ...
* Opening http://127.0.0.1:40612/api/v1/namespaces/kube-system/services/http:kubernetes-dashboard:/proxy/ in your default browser...
xdg-open: no method available for opening 'http://127.0.0.1:40612/api/v1/namespaces/kube-system/services/http:kubernetes-dashboard:/proxy/'
* failed to open browser: exit status 3


2. Ensure the GUI packages are installed in your system.

[root@kubebase ~]# yum groupinstall 'X Window System' 'GNOME'
Loaded plugins: fastestmirror
There is no installed groups file.
Maybe run: yum groups mark convert (see man yum)
Loading mirror speeds from cached hostfile
 * base: mirrors.viethosting.com
 * extras: mirrors.viethosting.com
 * updates: mirrors.viethosting.com
Resolving Dependencies
--> Running transaction check
---> Package NetworkManager-libreswan-gnome.x86_64 0:1.2.4-2.el7 will be installed

If you get an error like below during the package installation, Please refer to this article.

Transaction check error:
file /boot/efi/EFI/centos from install of fwupdate-efi-12-5.el7.centos.x86_64 conflicts with file from package grub2-common-1:2.02-0.65 .el7.centos.2.noarch

Error Summary


3. Install firefox package to the browser.

[root@kubebase centos]# yum install firefox
Loaded plugins: fastestmirror
Loading mirror speeds from cached hostfile
 * base: mirrors.viethosting.com
 * extras: mirrors.viethosting.com
 * updates: mirrors.viethosting.com
Resolving Dependencies
--> Running transaction check
---> Package firefox.x86_64 0:60.6.1-1.el7.centos will be installed
--> Processing Dependency: redhat-indexhtml for package: firefox-60.6.1-1.el7.centos.x86_64
--> Processing Dependency: mozilla-filesystem for package: firefox-60.6.1-1.el7.centos.x86_64
--> Processing Dependency: liberation-sans-fonts for package: firefox-60.6.1-1.el7.centos.x86_64
--> Processing Dependency: liberation-fonts-common for package: firefox-60.6.1-1.el7.centos.x86_64
--> Running transaction check


4. Try to access the Minikube dashboard.

[root@kubebase ~]# minikube dashboard
* Enabling dashboard ...
* Verifying dashboard health ...
* Launching proxy ...
* Verifying proxy health ...
* Opening http://127.0.0.1:41862/api/v1/namespaces/kube-system/services/http:kubernetes-dashboard:/proxy/ in your default browser...
START /usr/bin/firefox "http://127.0.0.1:41862/api/v1/namespaces/kube-system/services/http:kubernetes-dashboard:/proxy/"
Running without a11y support!
libGL error: unable to load driver: swrast_dri.so
libGL error: failed to load driver: swrast

I have received the following error while accessing the dashboard.

libGL error: unable to load driver: swrast_dri.so
libGL error: failed to load driver: swrast


5. Update the system using “yum update”.

[root@kubebase ~]# yum update
Loaded plugins: fastestmirror
Loading mirror speeds from cached hostfile
 * base: mirrors.viethosting.com
 * extras: mirrors.viethosting.com
 * updates: mirrors.viethosting.com
Resolving Dependencies
--> Running transaction check
---> Package GeoIP.x86_64 0:1.5.0-11.el7 will be updated
---> Package GeoIP.x86_64 0:1.5.0-13.el7 will be an update
---> Package alsa-lib.x86_64 0:1.1.4.1-2.el7 will be updated


6. Re-try to access the “Minikube” dashboard.

[root@kubebase ~]# minikube dashboard
* Enabling dashboard ...
* Verifying dashboard health ...
* Launching proxy ...
* Verifying proxy health ...
* Opening http://127.0.0.1:34375/api/v1/namespaces/kube-system/services/http:kubernetes-dashboard:/proxy/ in your default browser...
START /usr/bin/firefox "http://127.0.0.1:34375/api/v1/namespaces/kube-system/services/http:kubernetes-dashboard:/proxy/"
Running without a11y support!

7. Minikube dashboard has been launched successfully using the ssh X11 forwarding.

Enable Kubernetes Dashboard - Minikube
Minikube dashboard


How to access the Minikube dashboard remotely using the host IP?

1. Here is the host IP . “virsh” command shows that KVM Minikube is up and running.

[root@kubebase ~]# ip a |grep inet |grep ens33
    inet 192.168.3.165/24 brd 192.168.3.255 scope global noprefixroute dynamic ens33
[root@kubebase ~]#
[root@kubebase ~]#
[root@kubebase ~]# virsh list --all
 Id    Name                           State
----------------------------------------------------
 2     minikube                       running
[root@kubebase ~]#


2. Expose the Kube proxy to listen to all the IP. This is valid only for the current SSH session. To make it persistent, add it in startup scripts.

[root@kubebase ~]# kubectl proxy --address='0.0.0.0' --disable-filter=true &
[1] 75827
[root@kubebase ~]#


3. Find out the base URL for dashboard access. From the following URL, we need to swap the host URL & Port to access the dashboard.

[root@kubebase ~]# kubectl cluster-info
Kubernetes master is running at https://192.168.39.109:8443
KubeDNS is running at https://192.168.39.109:8443/api/v1/namespaces/kube-system/services/kube-dns:dns/proxy

To further debug and diagnose cluster problems, use 'kubectl cluster-info dump'.
[root@kubebase ~]#


4. Here is my URL to access the Minikube dashboard for remote access. “http://192.168.3.165:8001/api/v1/namespaces/kube-system/services/http:kubernetes-dashboard:/proxy/”

Enable Remote - Kubernetes Dashboard - Minikube
Kubernetes Dashboard – Minikube

We have successfully enabled and accessed the Minikube – Kubernetes dashboard.


Hope this article is informative to you.  Follow UnixArena on Social media to get regular updates.

The post Kubernetes /Minikube – Enable Dashboard – RHEL 7 / CentOS 7 appeared first on UnixArena.

Viewing all 429 articles
Browse latest View live


<script src="https://jsc.adskeeper.com/r/s/rssing.com.1596347.js" async> </script>